Watch Man Watcher
This is a circuit that can be used at night in places like offices, stores, and warehouses, among other places, to determine whether or not the watchman who is responsible for your establ…
Know the mission before touching a wire.
Understand what you are making, prepare the right tools, and make the workbench safe.
Project details
Watch Man Watcher is a electronics project. This is a circuit that can be used at night in places like offices, stores, and warehouses, among other places, to determine whether or not the watchman who is responsible for your establ…
- Source pages
- 356-358
- Named parts
- 4
- Build goal
- Working, tested prototype
Tools you need
- Digital multimeter
- Wire stripper and side cutters
- Soldering iron with a fine tip
- Current-limited bench supply
Use eye protection, good lighting, and a clean insulated surface throughout the build.
Safety precautions
- Disconnect every power source before changing a connection.
- Check component polarity, pinout, and supply voltage twice.
- Use a current limit for the first power-up.
- Keep liquids, loose metal, and uninsulated wires away from the bench.
Gather, identify, and understand every part.
Use the standardized inventory, then open What's this? to learn each part's role, advantages, limitations, handling, and specifications.
What's this?Image, role, pros, cons, handling & specifications
 MODULE LEARNING VIEW
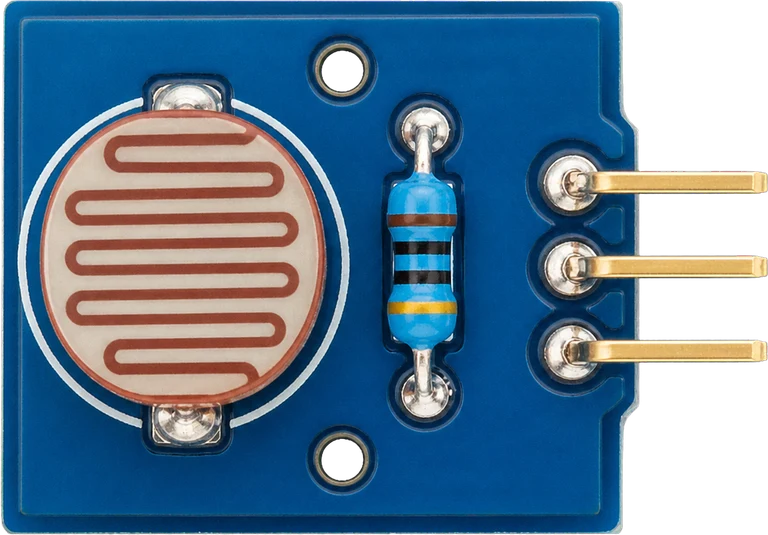
LDR
A sensor converts a physical condition into an electrical signal the circuit can measure.
What it does hereIt provides project input as an analogue, digital, resistive, frequency, or calibrated signal.
Buy / compare this part ↗Advantages
- Adds real-world awareness
- Can usually be tested independently
- Often supports calibration
Limitations
- Readings can drift
- Placement affects results
- Some sensors need warm-up or calibration
Handling
- Protect the sensing surface
- Observe supply voltage and polarity
- Keep signal leads away from noisy power wiring
Specifications to verify
- Use the exact model, value, package, and rating listed for LDR; similar-looking parts are not always interchangeable.
- Confirm supply range, output type, measurement range, accuracy, response time, and pin order.
What's this?Image, role, pros, cons, handling & specifications
Power supply
A power component supplies, converts, stores, or regulates energy for the project.
What it does hereIt must provide the documented voltage, polarity, isolation, and sufficient current safely.
Buy / compare this part ↗Advantages
- Stable power improves reliability
- Current limiting protects first tests
- Regulation reduces resets and noise
Limitations
- Wrong polarity can cause immediate damage
- Underrated parts overheat
- Mains circuits require qualified supervision
Handling
- Measure output before connection
- Use a fuse or current limit
- Insulate exposed conductors
Specifications to verify
- Use the exact model, value, package, and rating listed for Power supply; similar-looking parts are not always interchangeable.
- Confirm input/output voltage, current, polarity, connector, isolation, and thermal rating.
What's this?Image, role, pros, cons, handling & specifications
TIP-AND
A named project component whose exact role is defined by the source circuit and build guide.
What it does hereIt performs a documented electrical, control, interface, or construction function in this project.
Buy / compare this part ↗Advantages
- Selected for this project
- Can be checked independently
- Supports modular troubleshooting
Limitations
- Substitutes may differ
- Generic names can hide variants
- Pinouts and ratings vary
Handling
- Compare the received part with the source
- Keep it labelled
- Do not force connectors or adjusters
Specifications to verify
- Use the exact model, value, package, and rating listed for TIP-AND; similar-looking parts are not always interchangeable.
- Confirm dimensions, ratings, connection method, polarity, and environmental limits.
What's this?Image, role, pros, cons, handling & specifications
MAXIMUM
A named project component whose exact role is defined by the source circuit and build guide.
What it does hereIt performs a documented electrical, control, interface, or construction function in this project.
Buy / compare this part ↗Advantages
- Selected for this project
- Can be checked independently
- Supports modular troubleshooting
Limitations
- Substitutes may differ
- Generic names can hide variants
- Pinouts and ratings vary
Handling
- Compare the received part with the source
- Keep it labelled
- Do not force connectors or adjusters
Specifications to verify
- Use the exact model, value, package, and rating listed for MAXIMUM; similar-looking parts are not always interchangeable.
- Confirm dimensions, ratings, connection method, polarity, and environmental limits.
Connect one verified path at a time.
Explore the named components and standardized signal flow, then use Source Check to verify exact physical pins, values, and topology before applying power.
Trace this circuit.
Watch Man Watcher: interactive parts, standardized terminals, responsive anchored wires, student explanations, and the original circuit reference in one shared system.
Trace before wiring
Follow power, ground, inputs, processing, and outputs in that order. Never guess a pin from package shape alone.
Connect with power off
Make short, labelled connections and share a common ground only where the schematic requires it.
Inspect every joint
Check continuity, polarity, adjacent shorts, and loose connections before the first power-up.
Open all source diagrams and build views 1 visuals
Confirm the hardware-only control path.
This project does not include firmware in the source. The circuit itself provides the required behaviour.
How to connect
- Match every controller label to the circuit view and source pin map.
- Join grounds before signal wires when separate low-voltage supplies are used.
- Keep motors, relays, pumps, and other loads on a suitable driver and external supply.
Common mistakes
Reversed VCC/GND, board-label versus GPIO-number confusion, missing common ground, and charge-only USB cables.
Troubleshoot
Disconnect loads, continuity-test one path at a time, then test with a current limit.
Software preparation
No IDE, board package, library, or firmware upload is required for this project.
If you add a programmable controller as an extension, document its pin map separately.
How to upload code
The original design is implemented entirely in hardware, so proceed after verifying the circuit and supply.
Assemble, deploy, test, and troubleshoot.
Use the complete source notes in build order, then pass the final checks before calling the project finished.
Build in functional stages
- Power and regulation
- Controller or processing stage
- Inputs and sensors
- Outputs and loads
- Enclosure and strain relief
Power up safely
- Inspect unpowered continuity first
- Apply the lowest safe current limit
- Measure supply rails before signals
- Add one load at a time
- Record expected and actual results
Work from simple to complex
- Confirm power, ground, polarity, and orientation
- Compare each pin with the source
- Test inputs separately from outputs
- Replace only one variable at a time
- Power off before every correction
Follow the documented instructions.
These notes come from this project's source and remain in their original order.
Project overview
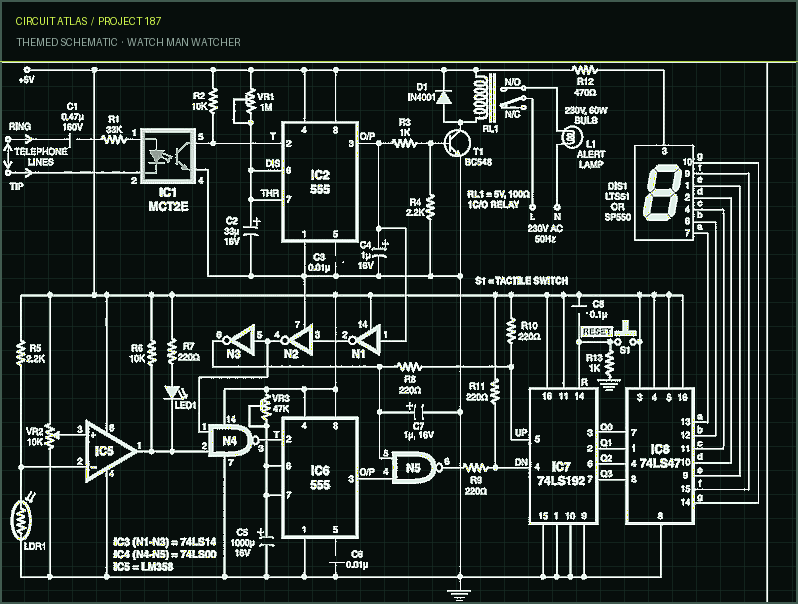
Project build noteThis is a circuit that can be used at night in places like offices, stores, and warehouses, among other places, to determine whether or not the watchman who is responsible for your establishment is working. In order to function, it makes use of an existing telephone that is located as close as possible to the watchman's station (for example, in an office or store). You can send an audible alarm to the watchman by simply dialing the office or store's telephone number from your home or any other location, preferably by using your mobile phone. This should be done as quickly as possible. The provided circuit is able to detect the ring, and the watchman is also provided with a visible warning signal in the form of a bright bulb. Soon after the ring tone, the lamp continues to be "on" for a period of time that is close to sixty seconds. The watchman is given instructions to signify his presence by merely directing the light beam from his torch toward an LDR sensor unit that has been installed on the wall (without lifting the handset off-cradle of the ringing telephone). During the window of time in which the warning lamp is on, this task needs to be completed. In the event that he is unable to complete it within the allotted amount of time, the circuit
will record his absence by increasing a count. If he does it, the count will not be affected in any way. There is room for up to nine distinct alert bells in this scenario. The number that is displayed on the screen is the total amount of times that the watchman overlooked his presence. The timing details can be obtained by using the called number in conjunction with the displayed count on the mobile phone, which records both the called number and the call time. By setting its reset pin 14 to high using the reset switch S1, the telephone lines Counter 74LS192 (IC7) can be reset to the zero state. This applies to both the TIP and RING lines. The IC 74LS47 provides the power for the 7-segment, common-anode display known as DIS1 (IC8). After what feels like an eternity, the count of one is finally displayed as the phone rings. This occurs if the watchman is unable to concentrate the beam of the torchlight on the LDR1. If the LDR1 photoresistor detects light from the watchman's torch within the allotted amount of time, the down clock will remain high until the up clock also reaches its maximum. Since the counter first counts upwards and then counts downwards, the count, in practice, does not change.
Every component, with the exception of LDR1, is stored in a cabinet that is hermetically sealed and has a locking mechanism. Only LDR1 is mounted on the wall and may be seen from the outside. This is done to prevent the counter from having to be reset manually. In the event that the power goes out, the count will not have to be reset because the circuit will be powered by a battery.
The following is a condensed version of the operating procedure
Project build note1. In the beginning, when the power supply is turned on, the power-on-reset components C8 and R13 reset the counter IC7, and the display shows the number 0. 2. From the outside or from your mobile device, dial the telephone number of the location where the parallel system is installed. In the beginning, the alarm lamp L1 will light up and relay RL1 will become energized. 3. The number "1" is added to the counter whenever the warning bulb L1 is turned off. 4. The counter begins counting up, then counts down, and eventually shows 0 on the display if the watchman focuses the torchlight beam on LDR1 while the alert lamp L1 is still blazing. This provides evidence that the watchman is currently on duty. 5. If the watchman focuses the torchlight beam on LDR1 after the alarm lamp L1 goes off, then up counting will occur, and the display will show the number 1. This suggests that the watchman is not present at the moment.
You built Watch Man Watcher.
You followed the full workflow from understanding the mission to testing the finished project. That is a real engineering achievement - well done.
Under-/Over-Voltage Beep for Manual Stabilizer
Ready to reuse what you learned in another project from the same track?
Start this project →