DIY IoT Water pH Meter using pH Sensor & ESP32
500.DIY IoT Water pH Meter using pH Sensor & ESP32 In this project, we'll use a pH sensor and an ESP32 WiFi module to make our own DIY IoT-based water pH meter. Earlier on in this series…
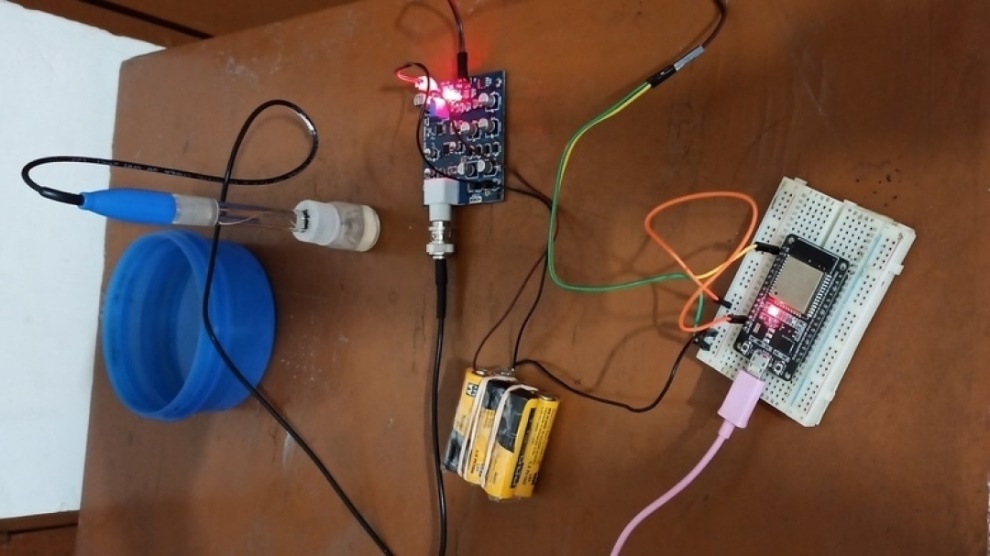
Know the mission before touching a wire.
Understand what you are making, prepare the right tools, and make the workbench safe.
Project details
DIY IoT Water pH Meter using pH Sensor & ESP32 is a iot project. 500.DIY IoT Water pH Meter using pH Sensor & ESP32 In this project, we'll use a pH sensor and an ESP32 WiFi module to make our own DIY IoT-based water pH meter. Earlier on in this series…
- Source pages
- 1462-1472
- Named parts
- 15
- Build goal
- Working, tested prototype
Tools you need
- Digital multimeter
- Wire stripper and side cutters
- Soldering iron with a fine tip
- Current-limited bench supply
- Computer with a data-capable USB cable
Use eye protection, good lighting, and a clean insulated surface throughout the build.
Safety precautions
- Disconnect every power source before changing a connection.
- Check component polarity, pinout, and supply voltage twice.
- Use a current limit for the first power-up.
- Keep liquids, loose metal, and uninsulated wires away from the bench.
Gather, identify, and understand every part.
Use the standardized inventory, then open What's this? to learn each part's role, advantages, limitations, handling, and specifications.
What's this?Image, role, pros, cons, handling & specifications
ESP32 Board ESP32 ESP-32S Development Board (ESP
A programmable controller that reads inputs, makes decisions, and drives the project's outputs.
What it does hereIt is the control centre and must use the documented board, pin map, supply, and logic level.
Buy / compare this part ↗Advantages
- Reprogrammable and reusable
- Large learning ecosystem
- Complex behaviour remains changeable
Limitations
- GPIO voltage and current are limited
- Some pins affect boot or communication
- Loads normally need a driver
Handling
- Disconnect power before rewiring
- Avoid static discharge
- Never power motors, relays, or pumps directly from GPIO
Specifications to verify
- Use the exact model, value, package, and rating listed for ESP32 Board ESP32 ESP-32S Development Board (ESP; similar-looking parts are not always interchangeable.
- Confirm operating voltage, logic level, pinout, memory, USB interface, and maximum GPIO current.
What's this?Image, role, pros, cons, handling & specifications
WROOM-32)
A named project component whose exact role is defined by the source circuit and build guide.
What it does hereIt performs a documented electrical, control, interface, or construction function in this project.
Buy / compare this part ↗Advantages
- Selected for this project
- Can be checked independently
- Supports modular troubleshooting
Limitations
- Substitutes may differ
- Generic names can hide variants
- Pinouts and ratings vary
Handling
- Compare the received part with the source
- Keep it labelled
- Do not force connectors or adjusters
Specifications to verify
- Use the exact model, value, package, and rating listed for WROOM-32); similar-looking parts are not always interchangeable.
- Confirm dimensions, ratings, connection method, polarity, and environmental limits.
What's this?Image, role, pros, cons, handling & specifications
pH Sensor PH SENSOR KIT for Water
A sensor converts a physical condition into an electrical signal the circuit can measure.
What it does hereIt provides project input as an analogue, digital, resistive, frequency, or calibrated signal.
Buy / compare this part ↗Advantages
- Adds real-world awareness
- Can usually be tested independently
- Often supports calibration
Limitations
- Readings can drift
- Placement affects results
- Some sensors need warm-up or calibration
Handling
- Protect the sensing surface
- Observe supply voltage and polarity
- Keep signal leads away from noisy power wiring
Specifications to verify
- Use the exact model, value, package, and rating listed for pH Sensor PH SENSOR KIT for Water; similar-looking parts are not always interchangeable.
- Confirm supply range, output type, measurement range, accuracy, response time, and pin order.
What's this?Image, role, pros, cons, handling & specifications
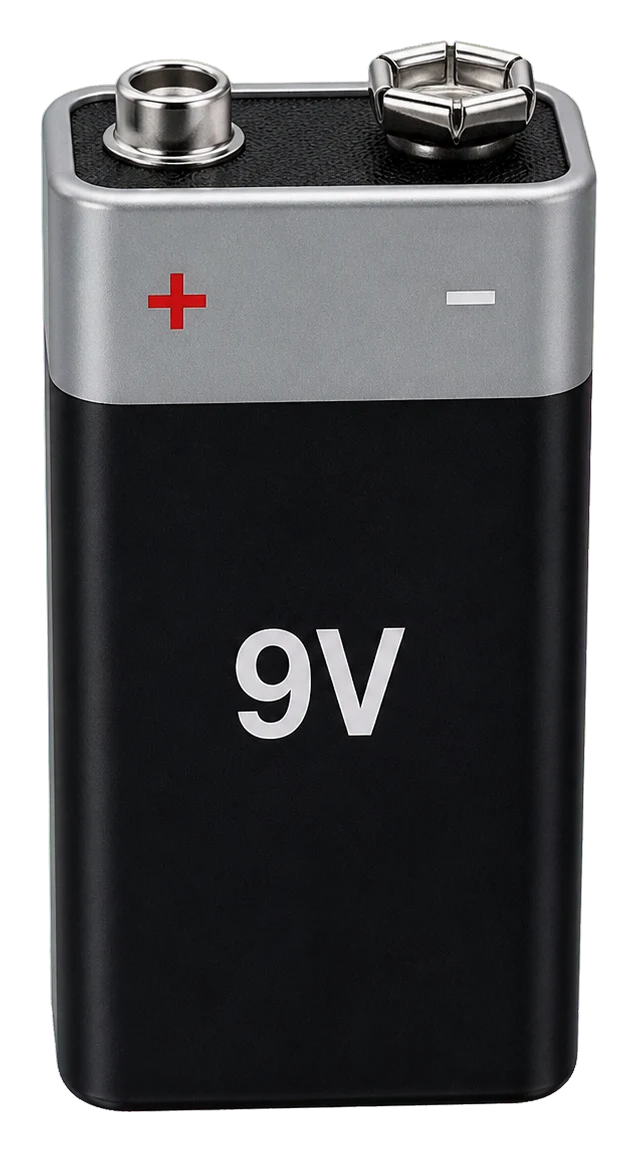 POWER LEARNING VIEW
Battery 9V Battery or DC Adapter
A power component supplies, converts, stores, or regulates energy for the project.
What it does hereIt must provide the documented voltage, polarity, isolation, and sufficient current safely.
Buy / compare this part ↗Advantages
- Stable power improves reliability
- Current limiting protects first tests
- Regulation reduces resets and noise
Limitations
- Wrong polarity can cause immediate damage
- Underrated parts overheat
- Mains circuits require qualified supervision
Handling
- Measure output before connection
- Use a fuse or current limit
- Insulate exposed conductors
Specifications to verify
- Use the exact model, value, package, and rating listed for Battery 9V Battery or DC Adapter; similar-looking parts are not always interchangeable.
- Confirm input/output voltage, current, polarity, connector, isolation, and thermal rating.
What's this?Image, role, pros, cons, handling & specifications
Jumper Wires, Breadboard
A named project component whose exact role is defined by the source circuit and build guide.
What it does hereIt performs a documented electrical, control, interface, or construction function in this project.
Buy / compare this part ↗Advantages
- Selected for this project
- Can be checked independently
- Supports modular troubleshooting
Limitations
- Substitutes may differ
- Generic names can hide variants
- Pinouts and ratings vary
Handling
- Compare the received part with the source
- Keep it labelled
- Do not force connectors or adjusters
Specifications to verify
- Use the exact model, value, package, and rating listed for Jumper Wires, Breadboard; similar-looking parts are not always interchangeable.
- Confirm dimensions, ratings, connection method, polarity, and environmental limits.
What's this?Image, role, pros, cons, handling & specifications
PH Sensor KIT for Water
A sensor converts a physical condition into an electrical signal the circuit can measure.
What it does hereIt provides project input as an analogue, digital, resistive, frequency, or calibrated signal.
Buy / compare this part ↗Advantages
- Adds real-world awareness
- Can usually be tested independently
- Often supports calibration
Limitations
- Readings can drift
- Placement affects results
- Some sensors need warm-up or calibration
Handling
- Protect the sensing surface
- Observe supply voltage and polarity
- Keep signal leads away from noisy power wiring
Specifications to verify
- Use the exact model, value, package, and rating listed for PH Sensor KIT for Water; similar-looking parts are not always interchangeable.
- Confirm supply range, output type, measurement range, accuracy, response time, and pin order.
What's this?Image, role, pros, cons, handling & specifications
electrode and has been developed specifically for use with Arduino
A programmable controller that reads inputs, makes decisions, and drives the project's outputs.
What it does hereIt is the control centre and must use the documented board, pin map, supply, and logic level.
Buy / compare this part ↗Advantages
- Reprogrammable and reusable
- Large learning ecosystem
- Complex behaviour remains changeable
Limitations
- GPIO voltage and current are limited
- Some pins affect boot or communication
- Loads normally need a driver
Handling
- Disconnect power before rewiring
- Avoid static discharge
- Never power motors, relays, or pumps directly from GPIO
Specifications to verify
- Use the exact model, value, package, and rating listed for electrode and has been developed specifically for use with Arduino; similar-looking parts are not always interchangeable.
- Confirm operating voltage, logic level, pinout, memory, USB interface, and maximum GPIO current.
What's this?Image, role, pros, cons, handling & specifications
measured. The reference system, which consists of the Ag/AgCl gel
A named project component whose exact role is defined by the source circuit and build guide.
What it does hereIt performs a documented electrical, control, interface, or construction function in this project.
Buy / compare this part ↗Advantages
- Selected for this project
- Can be checked independently
- Supports modular troubleshooting
Limitations
- Substitutes may differ
- Generic names can hide variants
- Pinouts and ratings vary
Handling
- Compare the received part with the source
- Keep it labelled
- Do not force connectors or adjusters
Specifications to verify
- Use the exact model, value, package, and rating listed for measured. The reference system, which consists of the Ag/AgCl gel; similar-looking parts are not always interchangeable.
- Confirm dimensions, ratings, connection method, polarity, and environmental limits.
What's this?Image, role, pros, cons, handling & specifications
Module Power: DC 9.00V 1A
A named project component whose exact role is defined by the source circuit and build guide.
What it does hereIt performs a documented electrical, control, interface, or construction function in this project.
Buy / compare this part ↗Advantages
- Selected for this project
- Can be checked independently
- Supports modular troubleshooting
Limitations
- Substitutes may differ
- Generic names can hide variants
- Pinouts and ratings vary
Handling
- Compare the received part with the source
- Keep it labelled
- Do not force connectors or adjusters
Specifications to verify
- Use the exact model, value, package, and rating listed for Module Power: DC 9.00V 1A; similar-looking parts are not always interchangeable.
- Confirm dimensions, ratings, connection method, polarity, and environmental limits.
What's this?Image, role, pros, cons, handling & specifications
Measuring Range: 0-14PH
A named project component whose exact role is defined by the source circuit and build guide.
What it does hereIt performs a documented electrical, control, interface, or construction function in this project.
Buy / compare this part ↗Advantages
- Selected for this project
- Can be checked independently
- Supports modular troubleshooting
Limitations
- Substitutes may differ
- Generic names can hide variants
- Pinouts and ratings vary
Handling
- Compare the received part with the source
- Keep it labelled
- Do not force connectors or adjusters
Specifications to verify
- Use the exact model, value, package, and rating listed for Measuring Range: 0-14PH; similar-looking parts are not always interchangeable.
- Confirm dimensions, ratings, connection method, polarity, and environmental limits.
What's this?Image, role, pros, cons, handling & specifications
Accuracy: ± 0.1pH (24)
A named project component whose exact role is defined by the source circuit and build guide.
What it does hereIt performs a documented electrical, control, interface, or construction function in this project.
Buy / compare this part ↗Advantages
- Selected for this project
- Can be checked independently
- Supports modular troubleshooting
Limitations
- Substitutes may differ
- Generic names can hide variants
- Pinouts and ratings vary
Handling
- Compare the received part with the source
- Keep it labelled
- Do not force connectors or adjusters
Specifications to verify
- Use the exact model, value, package, and rating listed for Accuracy: ± 0.1pH (24); similar-looking parts are not always interchangeable.
- Confirm dimensions, ratings, connection method, polarity, and environmental limits.
What's this?Image, role, pros, cons, handling & specifications
Response Time: 1min
A named project component whose exact role is defined by the source circuit and build guide.
What it does hereIt performs a documented electrical, control, interface, or construction function in this project.
Buy / compare this part ↗Advantages
- Selected for this project
- Can be checked independently
- Supports modular troubleshooting
Limitations
- Substitutes may differ
- Generic names can hide variants
- Pinouts and ratings vary
Handling
- Compare the received part with the source
- Keep it labelled
- Do not force connectors or adjusters
Specifications to verify
- Use the exact model, value, package, and rating listed for Response Time: 1min; similar-looking parts are not always interchangeable.
- Confirm dimensions, ratings, connection method, polarity, and environmental limits.
What's this?Image, role, pros, cons, handling & specifications
Industry Power Indicator LED Output: Analog values in the range
An output component turns an electrical control signal into light, sound, motion, switching, or displayed information.
What it does hereIt presents the circuit result or acts on the physical world.
Buy / compare this part ↗Advantages
- Makes system state visible
- Can be tested separately
- Supports clear troubleshooting
Limitations
- Loads may exceed controller current
- Polarity or driver direction can matter
- Inductive loads create voltage spikes
Handling
- Use the documented driver stage
- Check polarity and load current
- Add flyback protection for inductive loads
Specifications to verify
- Use the exact model, value, package, and rating listed for Industry Power Indicator LED Output: Analog values in the range; similar-looking parts are not always interchangeable.
- Confirm voltage, current, polarity, interface, driver requirements, and duty cycle.
What's this?Image, role, pros, cons, handling & specifications
Alkali Error: 0.2PH
A named project component whose exact role is defined by the source circuit and build guide.
What it does hereIt performs a documented electrical, control, interface, or construction function in this project.
Buy / compare this part ↗Advantages
- Selected for this project
- Can be checked independently
- Supports modular troubleshooting
Limitations
- Substitutes may differ
- Generic names can hide variants
- Pinouts and ratings vary
Handling
- Compare the received part with the source
- Keep it labelled
- Do not force connectors or adjusters
Specifications to verify
- Use the exact model, value, package, and rating listed for Alkali Error: 0.2PH; similar-looking parts are not always interchangeable.
- Confirm dimensions, ratings, connection method, polarity, and environmental limits.
What's this?Image, role, pros, cons, handling & specifications
ESP8266 - controller board / IC
A programmable controller that reads inputs, makes decisions, and drives the project's outputs.
What it does hereIt is the control centre and must use the documented board, pin map, supply, and logic level.
Buy / compare this part ↗Advantages
- Reprogrammable and reusable
- Large learning ecosystem
- Complex behaviour remains changeable
Limitations
- GPIO voltage and current are limited
- Some pins affect boot or communication
- Loads normally need a driver
Handling
- Disconnect power before rewiring
- Avoid static discharge
- Never power motors, relays, or pumps directly from GPIO
Specifications to verify
- Use the exact model, value, package, and rating listed for ESP8266 - controller board / IC; similar-looking parts are not always interchangeable.
- Confirm operating voltage, logic level, pinout, memory, USB interface, and maximum GPIO current.
Connect one verified path at a time.
Explore the named components and standardized signal flow, then use Source Check to verify exact physical pins, values, and topology before applying power.
Trace this circuit.
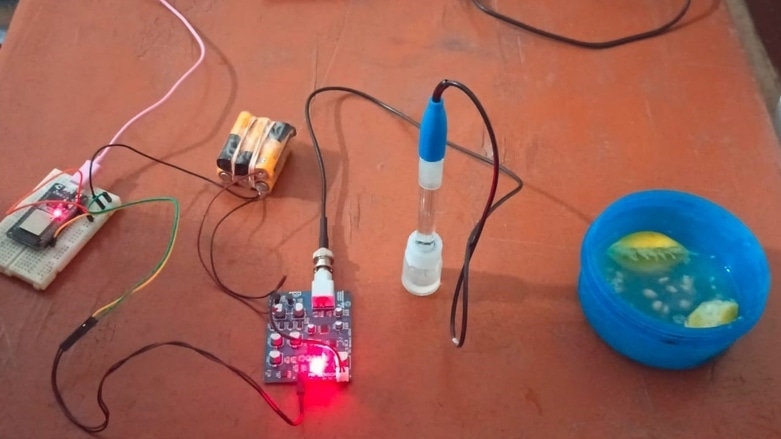
DIY IoT Water pH Meter using pH Sensor & ESP32: interactive parts, standardized terminals, responsive anchored wires, student explanations, and the original circuit reference in one shared system.
Trace before wiring
Follow power, ground, inputs, processing, and outputs in that order. Never guess a pin from package shape alone.
Connect with power off
Make short, labelled connections and share a common ground only where the schematic requires it.
Inspect every joint
Check continuity, polarity, adjacent shorts, and loose connections before the first power-up.
Open all source diagrams and build views 7 visuals
Prepare, upload, and verify the program.
Follow the same software sequence every time: verify connections, prepare the toolchain, compile, and upload.
How to connect
- Match every controller label to the circuit view and source pin map.
- Join grounds before signal wires when separate low-voltage supplies are used.
- Keep motors, relays, pumps, and other loads on a suitable driver and external supply.
Common mistakes
Reversed VCC/GND, board-label versus GPIO-number confusion, missing common ground, and charge-only USB cables.
Troubleshoot
Disconnect loads, continuity-test one path at a time, then test with a current limit.
Software preparation
- Install the current Arduino IDE or the software named in the guide.
- Install the correct board package and required libraries.
- Select the exact board, processor, and serial port.
- Compile once before connecting external loads.
How to upload code
- Connect the board with a data-capable USB cable.
- Open the documented sketch and confirm configuration values.
- Compile, fix the first reported error, and upload.
- Test with external loads disconnected first.
Common mistakes
Wrong port, missing library, incorrect board selection, boot pins held in the wrong state, or a busy serial port.
Basic Test Code
An analog sensor is used for measuring pH levels. In order to get the pH
value, we are going to transform the analog output voltage. The following is
some basic ESP32 with pH Sensor code. Make a copy of the code, and then
paste it into the appropriate spot in the Arduino IDE editor. Choose the
ESP32 from the Board Manager, and then pick the COM port from the
drop-down menu. You are able to upload the code at this time.
const int potPin=A0 ;
float ph ;
float Value= 0 ;

void setup () {
// put your setup code here, to run once:
Serial . begin ( 115200 );
pinMode ( potPin , INPUT );
delay ( 1000 );
}
void loop (){

Value= analogRead ( potPin );
Serial . print ( Value );
Serial . print ( " | " );
float voltage= Value* ( 3.3 / 4095.0 );
ph= ( 3.3 *voltage );
Serial . println ( ph );
delay ( 500 );
}
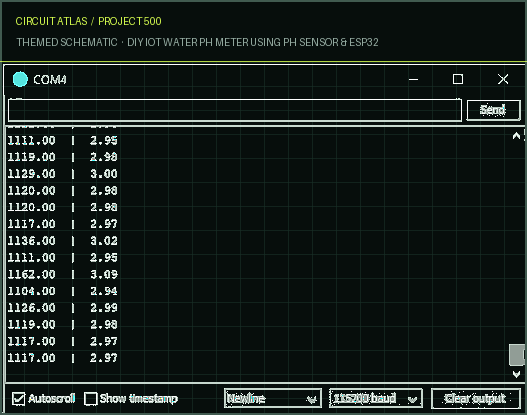
Open the Serial Monitor once you've finished uploading the code; the
sensor values ought to be displayed there.

After conducting certain tests on the lemon juice, we found that its pH
ranged between 2.8 and 3.0.
A simple detergent solution was also tested, and its results showed that its
pH was higher than 8.
In addition, we determined that the pH of milk was approximately 5.
Calibration of the sensor is not necessary if you have not altered the probe
that came standard with the ph sensor kit and serves as its reference point
for readings.

IoT Based Water pH Meter using pH Sensor & ESP32
Now let's develop another code in order to construct an Internet of Things-
based pH meter. With the help of this code, we are able to monitor the pH
level in every location on the planet. For the purpose of online monitoring
of the pH data, we will be utilizing the Thingspeak server.
IoT-based projects can benefit from the excellent technology provided by
ThingSpeak. Through the use of the ThingSpeak website, we are able to
control our system and monitor our data remotely via the Internet by
utilizing the Channels and web pages that are made available to us by
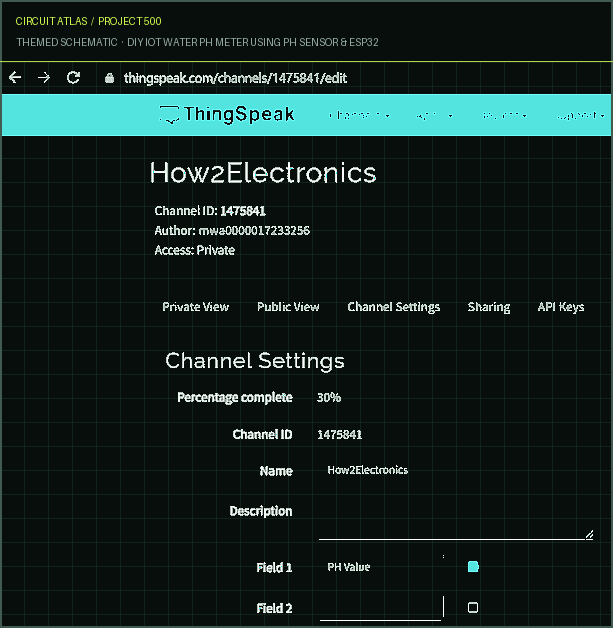
ThingSpeak. Therefore, the first thing you should do is register for a
ThingSpeak account. Visit the website at https://thingspeak.com and sign up
for an account there. After that, you should make a new channel and add a
widget for the pH Value.

The API keys should then be generated. This key is essential for making
any necessary programming changes as well as configuring your data.

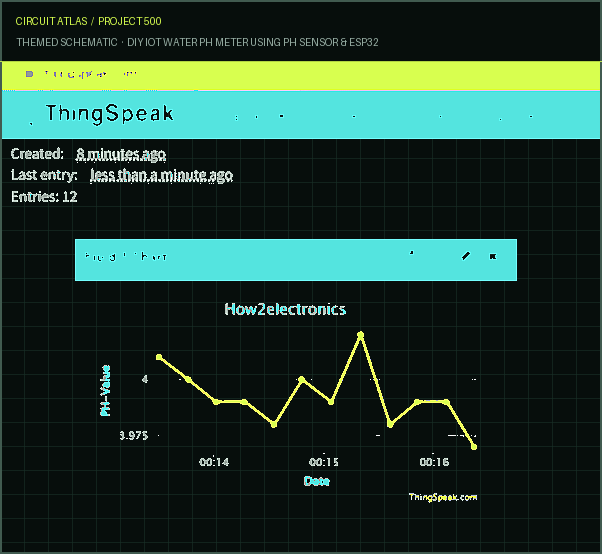
After the code has been successfully uploaded, the ESP32 will make an
attempt to connect to the WiFi network. The data will be uploaded to the
Thinkspeak server at regular intervals of 15 seconds.
On the Thinkspeak dashboard, as seen in the image, there is a private view
section where we may look at the values that have been uploaded. If you're
not happy with the Analog Ph Sensor, you can switch to the Atlas Scientific

Ph Sensor, which has better accuracy and results thanks to its I2C and
UART interfaces.
Summary
The following chapter should be quite interesting to you, and we presume
that you have practiced more than 500 Electronic Project Ideas as they will
be useful to you in building your dream project. In upcoming sessions, we
will cover How to troubleshoot and Fix Arduino Issues as well as how to
repurpose your old Arduino.
Essential Resources
Here are links to projects, tutorials, parts, and online communities
to help you get started with electronics projects
http://www.instructables.com/id/Electronic-Projects-For-Beginners/
http://www.instructables.com/id/Beginners-Electronics-Projects/Assemble, deploy, test, and troubleshoot.
Use the complete source notes in build order, then pass the final checks before calling the project finished.
Build in functional stages
- Power and regulation
- Controller or processing stage
- Inputs and sensors
- Outputs and loads
- Enclosure and strain relief
Power up safely
- Inspect unpowered continuity first
- Apply the lowest safe current limit
- Measure supply rails before signals
- Add one load at a time
- Record expected and actual results
Work from simple to complex
- Confirm power, ground, polarity, and orientation
- Compare each pin with the source
- Test inputs separately from outputs
- Replace only one variable at a time
- Power off before every correction
Follow the documented instructions.
These notes come from this project's source and remain in their original order.
Project overview
Project build note500.DIY IoT Water pH Meter using pH Sensor & ESP32 In this project, we'll use a pH sensor and an ESP32 WiFi module to make our own DIY IoT-based water pH meter. Earlier on in this series of tutorials, we made a portable ph meter by interfacing an Arduino with a pH Sensor. On an OLED screen, the data from the pH reading was presented.
This is an entirely new project, in which we will make use of a more sophisticated pH sensor than in the previous one. The pH Sensor that is being utilized in this situation is an analog type pH Sensor that provides a linear pH measurement in the range of 0 to 14 pH. We are going to transfer the data to ThingSpeak Server rather than showing it on an OLED panel. The ESP32, which is the gadget we are using, posts data to the ThingSpeak platform, which then delivers rapid visualizations of that data. When compared to Arduino, which only has a 10-bit analog to digital converter (ADC), the ESP32's 12-bit controller with built-in ADC allows for more accurate data measurement. It includes a high-resolution pH probe that takes readings of the pH of liquids at intervals that are set by the user and then sends the data to distant servers. The pH probe is equipped with a cable that is five feet long and can be submerged in any solution. The amount of time required to respond is less than one minute.
We are able to implement this IoT-based pH meter in a variety of settings, including hydroponics, laboratories, and aquariums. Now that we know how to create our own pH meter, let's learn how to interface the pH sensor with the ESP32. The pH Sensor Calibration technique is additionally covered in this project.
Part Required
Project build noteESP32 Board ESP32 ESP-32S Development Board (ESP- WROOM-32) pH Sensor PH SENSOR KIT for Water Battery 9V Battery or DC Adapter Connecting Wires Jumper Wires, Breadboard PH Sensor KIT for Water This Analog pH Meter Kit comes complete with an industrial real-time electrode and has been developed specifically for use with Arduino,
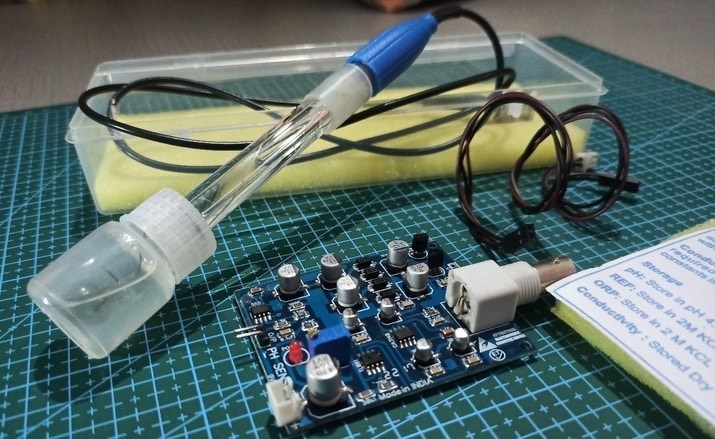
ESP8266, ESP32, and other Microcontrollers. It makes use of a standard electrode and has a built-in connection that is uncomplicated, practical, and convenient. It has a long life, which allows it to be particularly ideal for long-term online monitoring due to the fact that it can last up to a year. An LED on the signal connector board also serves as the Power Indicator for the device. In addition, the board features a connector of the BNC type and an interface for PH sensors. Simply attach a BNC connection to the pH sensor, and then insert the PH interface into the analog input port of any microcontroller. At this point, you are ready to utilize the device. You will easily be able to obtain the pH value if it is programmed. In addition to this, you can use a multimeter to determine the output voltage. An industrial pH electrode that features a sensitive glass membrane and a low impedance, this electrode is designed for use in industrial settings. It has a quick response time and great temperature stability, making it suitable for use in a wide range of PH tests. It is difficult to hydrolyze, has a high degree of repeatability, and has the ability to eliminate basic alkali mistake. The output voltage is linear between 0 and 14 pH, where the pH range is measured. The reference system, which consists of the Ag/AgCl gel electrolyte salt bridge, has a strong anti-pollution performance and a steady half-cell potential. Because it is difficult to clog the ring PTFE membrane, the electrode is well-suited for continuous online detection over an extended period of time. Specifications for the PH Sensor Module Power: DC 9.00V 1A Measuring Range: 0-14PH Accuracy: ± 0.1pH (24)
Response Time: 1min Industry Power Indicator LED Output: Analog values in the range of pH Electrode with BNC Connector (0.5V to 3V) Alkali Error: 0.2PH The internal resistance is equal to 250 MO.
Instructions for Calibration
Project build noteThis instrument has been calibrated with reference to the PH sensor that is included in this Kit. Also, if the PH sensor probe is adjusted in any way, the results could not be correct. Because of this, recalibration is necessary whenever the PH sensor Probe is replaced. The outcomes are proportional to the temperature of the solution in a simple and straightforward way. It is possible to calibrate the sensor at the following values: PH4 = 1.5V, PH7 = 2.0V, and PH9 = 2.5V. Before utilizing this sensor, you must first lace the PH Sensor probe in a vertical position and let it sit for a considerable amount of time. If the sensor probe is utilized on several occasions over the course of two to three days, it will produce very satisfying outcomes. Before submerging the sensor prove tube in the test solution, it should first be washed in deionized water and then blotted dry with tissue paper. Will take roughly thirty to forty seconds for the results to become stable. After the reading is written down, repeat the process of rinsing the probe tip in deionized water, dabbing it with dry tissue paper, and then placing the storage cap on the probe before placing it in the storage solution.
Precautions
Project build notePH sensor probe Because the tip of the tube is so delicate, you should avoid touching it with your hands and avoid placing it on the ground. Because of
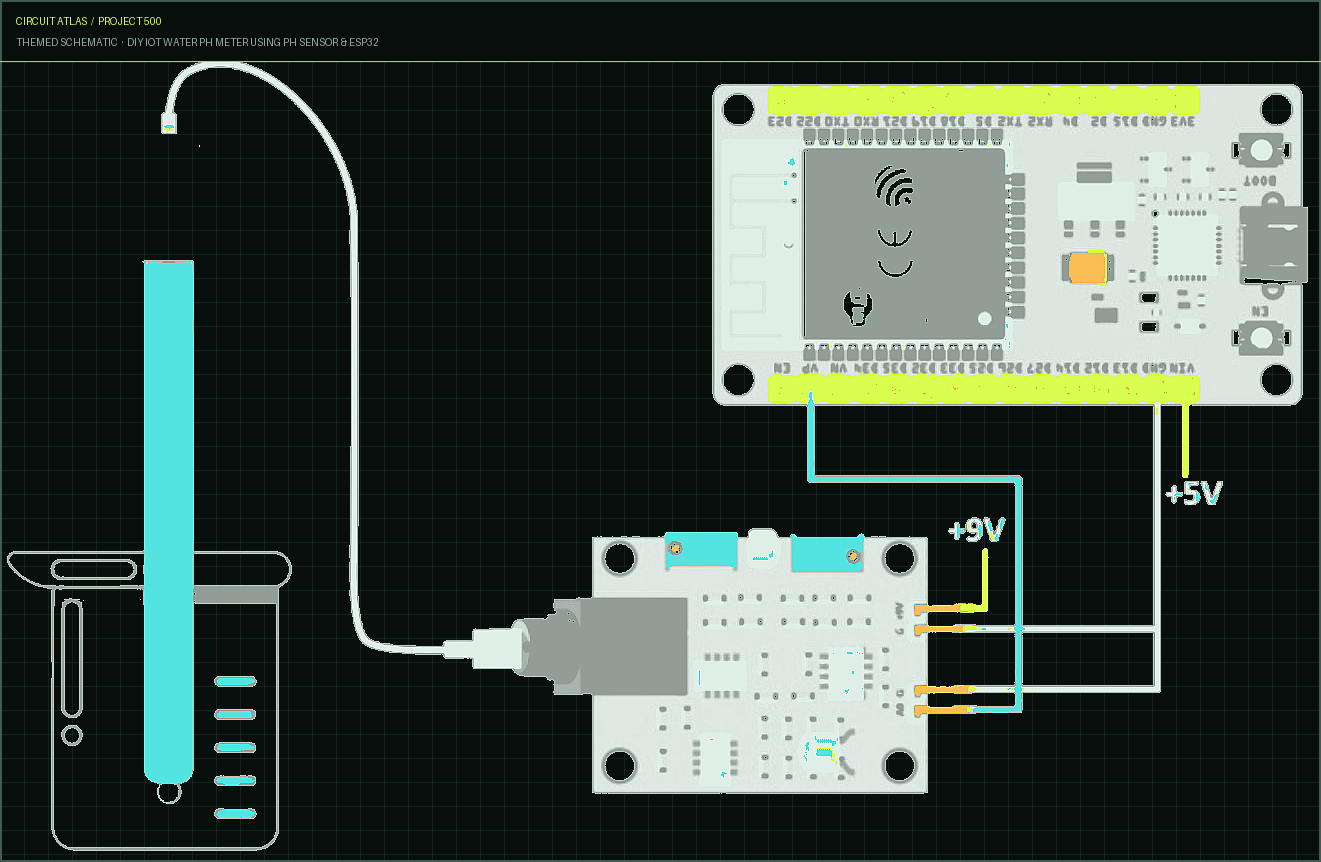
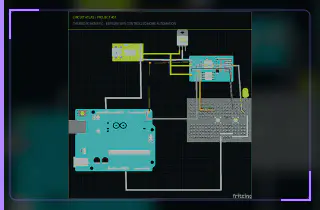
its extreme fragility, the bulb-shaped tip must always be kept in the storage solution while it is not in use. Circuit Diagram: Testing the Interfacing between the PH Sensor and the ESP32 Let's begin with the most fundamental level of interfacing and testing of the pH sensor with the ESP32 WiFi Module before moving on to the IoT pH Meter. You can use either an external 9-volt battery or a 9-volt DC supply to power the pH, Sensor. Connect the A0 pin of the ESP32 to the output pin of the pH sensor signal board. The ESP32's VP pin can serve in this capacity. The output of the sensor has a range of 0.5V to 3V, which enables the sensor to be utilized with the analog pins of the ESP32.
Electronicsforu.com
Project build notehttps://www.electronicsforu.com/category/electronics- projects/hardware-diy 5 Beginner Projects That Work on The Initial Attempt: Links to videos of simple projects, with a clap on/clap off switch. http://www.buildcircuit.com/5-beginners-projects-that-work-in-the- first-attempt/
You built DIY IoT Water pH Meter using pH Sensor & ESP32.
You followed the full workflow from understanding the mission to testing the finished project. That is a real engineering achievement - well done.
ESP 8266 Wifi Controlled Home Automation
Ready to reuse what you learned in another project from the same track?
Start this project →