Monitoring the Indoor Environment Using an ESP32 and an LCD Display
Display This is a straightforward project for monitoring the indoor environment using an ESP32 and LCD panels. We are going to make use of an Indoor Environment Expansion board that has a…
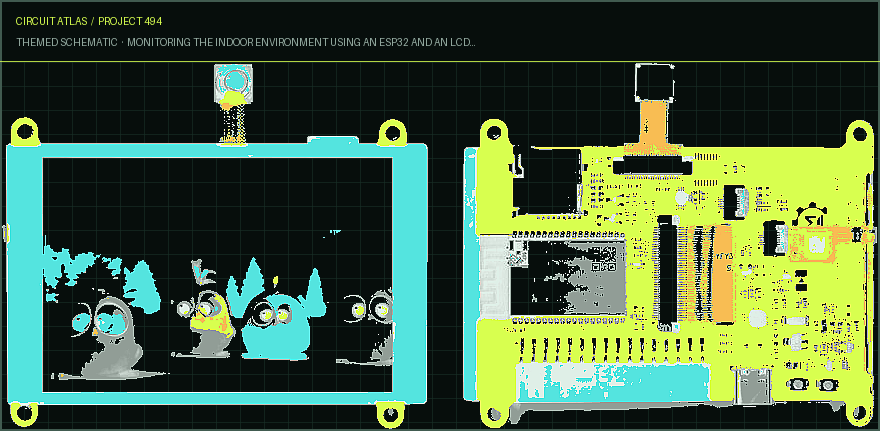
Know the mission before touching a wire.
Understand what you are making, prepare the right tools, and make the workbench safe.
Project details
Monitoring the Indoor Environment Using an ESP32 and an LCD Display is a iot project. Display This is a straightforward project for monitoring the indoor environment using an ESP32 and LCD panels. We are going to make use of an Indoor Environment Expansion board that has a…
- Source pages
- 1415-1422
- Named parts
- 11
- Build goal
- Working, tested prototype
Tools you need
- Digital multimeter
- Wire stripper and side cutters
- Soldering iron with a fine tip
- Current-limited bench supply
- Computer with a data-capable USB cable
Use eye protection, good lighting, and a clean insulated surface throughout the build.
Safety precautions
- Disconnect every power source before changing a connection.
- Check component polarity, pinout, and supply voltage twice.
- Use a current limit for the first power-up.
- Keep liquids, loose metal, and uninsulated wires away from the bench.
Gather, identify, and understand every part.
Use the standardized inventory, then open What's this? to learn each part's role, advantages, limitations, handling, and specifications.
What's this?Image, role, pros, cons, handling & specifications
ESP32+TFT Touch Display
A programmable controller that reads inputs, makes decisions, and drives the project's outputs.
What it does hereIt is the control centre and must use the documented board, pin map, supply, and logic level.
Buy / compare this part ↗Advantages
- Reprogrammable and reusable
- Large learning ecosystem
- Complex behaviour remains changeable
Limitations
- GPIO voltage and current are limited
- Some pins affect boot or communication
- Loads normally need a driver
Handling
- Disconnect power before rewiring
- Avoid static discharge
- Never power motors, relays, or pumps directly from GPIO
Specifications to verify
- Use the exact model, value, package, and rating listed for ESP32+TFT Touch Display; similar-looking parts are not always interchangeable.
- Confirm operating voltage, logic level, pinout, memory, USB interface, and maximum GPIO current.
What's this?Image, role, pros, cons, handling & specifications
ESP32 3.5" TFT Touch (Capacitive) with Camera
A programmable controller that reads inputs, makes decisions, and drives the project's outputs.
What it does hereIt is the control centre and must use the documented board, pin map, supply, and logic level.
Buy / compare this part ↗Advantages
- Reprogrammable and reusable
- Large learning ecosystem
- Complex behaviour remains changeable
Limitations
- GPIO voltage and current are limited
- Some pins affect boot or communication
- Loads normally need a driver
Handling
- Disconnect power before rewiring
- Avoid static discharge
- Never power motors, relays, or pumps directly from GPIO
Specifications to verify
- Use the exact model, value, package, and rating listed for ESP32 3.5" TFT Touch (Capacitive) with Camera; similar-looking parts are not always interchangeable.
- Confirm operating voltage, logic level, pinout, memory, USB interface, and maximum GPIO current.
What's this?Image, role, pros, cons, handling & specifications
Indoor Environment Expansion board SPG30 + DHT11 Sensor +
A sensor converts a physical condition into an electrical signal the circuit can measure.
What it does hereIt provides project input as an analogue, digital, resistive, frequency, or calibrated signal.
Buy / compare this part ↗Advantages
- Adds real-world awareness
- Can usually be tested independently
- Often supports calibration
Limitations
- Readings can drift
- Placement affects results
- Some sensors need warm-up or calibration
Handling
- Protect the sensing surface
- Observe supply voltage and polarity
- Keep signal leads away from noisy power wiring
Specifications to verify
- Use the exact model, value, package, and rating listed for Indoor Environment Expansion board SPG30 + DHT11 Sensor +; similar-looking parts are not always interchangeable.
- Confirm supply range, output type, measurement range, accuracy, response time, and pin order.
What's this?Image, role, pros, cons, handling & specifications
Buzzer
An output component turns an electrical control signal into light, sound, motion, switching, or displayed information.
What it does hereIt presents the circuit result or acts on the physical world.
Buy / compare this part ↗Advantages
- Makes system state visible
- Can be tested separately
- Supports clear troubleshooting
Limitations
- Loads may exceed controller current
- Polarity or driver direction can matter
- Inductive loads create voltage spikes
Handling
- Use the documented driver stage
- Check polarity and load current
- Add flyback protection for inductive loads
Specifications to verify
- Use the exact model, value, package, and rating listed for Buzzer; similar-looking parts are not always interchangeable.
- Confirm voltage, current, polarity, interface, driver requirements, and duty cycle.
What's this?Image, role, pros, cons, handling & specifications
USB Cable
A named project component whose exact role is defined by the source circuit and build guide.
What it does hereIt performs a documented electrical, control, interface, or construction function in this project.
Buy / compare this part ↗Advantages
- Selected for this project
- Can be checked independently
- Supports modular troubleshooting
Limitations
- Substitutes may differ
- Generic names can hide variants
- Pinouts and ratings vary
Handling
- Compare the received part with the source
- Keep it labelled
- Do not force connectors or adjusters
Specifications to verify
- Use the exact model, value, package, and rating listed for USB Cable; similar-looking parts are not always interchangeable.
- Confirm dimensions, ratings, connection method, polarity, and environmental limits.
What's this?Image, role, pros, cons, handling & specifications
Type-C USB Cable for Programming
A named project component whose exact role is defined by the source circuit and build guide.
What it does hereIt performs a documented electrical, control, interface, or construction function in this project.
Buy / compare this part ↗Advantages
- Selected for this project
- Can be checked independently
- Supports modular troubleshooting
Limitations
- Substitutes may differ
- Generic names can hide variants
- Pinouts and ratings vary
Handling
- Compare the received part with the source
- Keep it labelled
- Do not force connectors or adjusters
Specifications to verify
- Use the exact model, value, package, and rating listed for Type-C USB Cable for Programming; similar-looking parts are not always interchangeable.
- Confirm dimensions, ratings, connection method, polarity, and environmental limits.
What's this?Image, role, pros, cons, handling & specifications
Connecting Wires Male to Female Jumper Wires
A named project component whose exact role is defined by the source circuit and build guide.
What it does hereIt performs a documented electrical, control, interface, or construction function in this project.
Buy / compare this part ↗Advantages
- Selected for this project
- Can be checked independently
- Supports modular troubleshooting
Limitations
- Substitutes may differ
- Generic names can hide variants
- Pinouts and ratings vary
Handling
- Compare the received part with the source
- Keep it labelled
- Do not force connectors or adjusters
Specifications to verify
- Use the exact model, value, package, and rating listed for Connecting Wires Male to Female Jumper Wires; similar-looking parts are not always interchangeable.
- Confirm dimensions, ratings, connection method, polarity, and environmental limits.
What's this?Image, role, pros, cons, handling & specifications
ESP32 3.5-Inch TFT Capacitive Touch Screen Display with Camera
A programmable controller that reads inputs, makes decisions, and drives the project's outputs.
What it does hereIt is the control centre and must use the documented board, pin map, supply, and logic level.
Buy / compare this part ↗Advantages
- Reprogrammable and reusable
- Large learning ecosystem
- Complex behaviour remains changeable
Limitations
- GPIO voltage and current are limited
- Some pins affect boot or communication
- Loads normally need a driver
Handling
- Disconnect power before rewiring
- Avoid static discharge
- Never power motors, relays, or pumps directly from GPIO
Specifications to verify
- Use the exact model, value, package, and rating listed for ESP32 3.5-Inch TFT Capacitive Touch Screen Display with Camera; similar-looking parts are not always interchangeable.
- Confirm operating voltage, logic level, pinout, memory, USB interface, and maximum GPIO current.
What's this?Image, role, pros, cons, handling & specifications
ESP32-WROVER chip, and incorporates an OV2640 camera with 2 million
A programmable controller that reads inputs, makes decisions, and drives the project's outputs.
What it does hereIt is the control centre and must use the documented board, pin map, supply, and logic level.
Buy / compare this part ↗Advantages
- Reprogrammable and reusable
- Large learning ecosystem
- Complex behaviour remains changeable
Limitations
- GPIO voltage and current are limited
- Some pins affect boot or communication
- Loads normally need a driver
Handling
- Disconnect power before rewiring
- Avoid static discharge
- Never power motors, relays, or pumps directly from GPIO
Specifications to verify
- Use the exact model, value, package, and rating listed for ESP32-WROVER chip, and incorporates an OV2640 camera with 2 million; similar-looking parts are not always interchangeable.
- Confirm operating voltage, logic level, pinout, memory, USB interface, and maximum GPIO current.
What's this?Image, role, pros, cons, handling & specifications
communicates with the ESP32 microcontroller via SPI (Serial Peripheral
A programmable controller that reads inputs, makes decisions, and drives the project's outputs.
What it does hereIt is the control centre and must use the documented board, pin map, supply, and logic level.
Buy / compare this part ↗Advantages
- Reprogrammable and reusable
- Large learning ecosystem
- Complex behaviour remains changeable
Limitations
- GPIO voltage and current are limited
- Some pins affect boot or communication
- Loads normally need a driver
Handling
- Disconnect power before rewiring
- Avoid static discharge
- Never power motors, relays, or pumps directly from GPIO
Specifications to verify
- Use the exact model, value, package, and rating listed for communicates with the ESP32 microcontroller via SPI (Serial Peripheral; similar-looking parts are not always interchangeable.
- Confirm operating voltage, logic level, pinout, memory, USB interface, and maximum GPIO current.
What's this?Image, role, pros, cons, handling & specifications
ESP8266 - controller board / IC
A programmable controller that reads inputs, makes decisions, and drives the project's outputs.
What it does hereIt is the control centre and must use the documented board, pin map, supply, and logic level.
Buy / compare this part ↗Advantages
- Reprogrammable and reusable
- Large learning ecosystem
- Complex behaviour remains changeable
Limitations
- GPIO voltage and current are limited
- Some pins affect boot or communication
- Loads normally need a driver
Handling
- Disconnect power before rewiring
- Avoid static discharge
- Never power motors, relays, or pumps directly from GPIO
Specifications to verify
- Use the exact model, value, package, and rating listed for ESP8266 - controller board / IC; similar-looking parts are not always interchangeable.
- Confirm operating voltage, logic level, pinout, memory, USB interface, and maximum GPIO current.
Connect one verified path at a time.
Explore the named components and standardized signal flow, then use Source Check to verify exact physical pins, values, and topology before applying power.
Trace this circuit.
Monitoring the Indoor Environment Using an ESP32 and an LCD Display: interactive parts, standardized terminals, responsive anchored wires, student explanations, and the original circuit reference in one shared system.
Trace before wiring
Follow power, ground, inputs, processing, and outputs in that order. Never guess a pin from package shape alone.
Connect with power off
Make short, labelled connections and share a common ground only where the schematic requires it.
Inspect every joint
Check continuity, polarity, adjacent shorts, and loose connections before the first power-up.
Open all source diagrams and build views 4 visuals
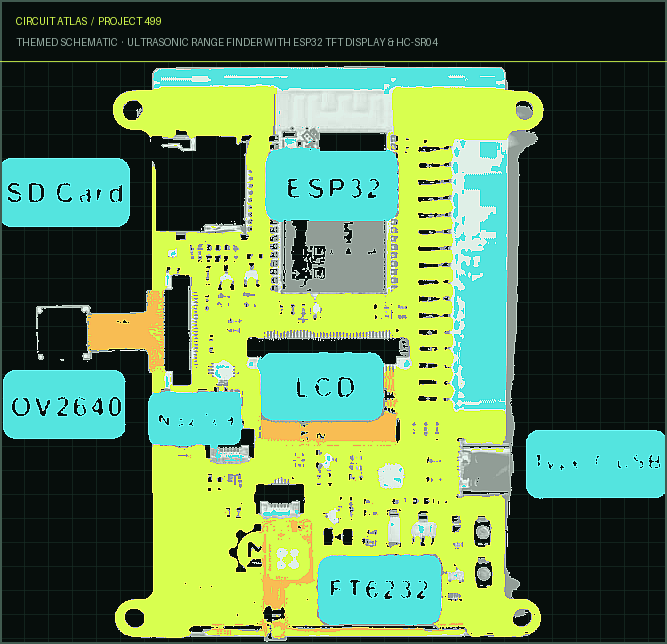
Confirm the hardware-only control path.
This project does not include firmware in the source. The circuit itself provides the required behaviour.
How to connect
- Match every controller label to the circuit view and source pin map.
- Join grounds before signal wires when separate low-voltage supplies are used.
- Keep motors, relays, pumps, and other loads on a suitable driver and external supply.
Common mistakes
Reversed VCC/GND, board-label versus GPIO-number confusion, missing common ground, and charge-only USB cables.
Troubleshoot
Disconnect loads, continuity-test one path at a time, then test with a current limit.
Software preparation
No IDE, board package, library, or firmware upload is required for this project.
If you add a programmable controller as an extension, document its pin map separately.
How to upload code
The original design is implemented entirely in hardware, so proceed after verifying the circuit and supply.
Assemble, deploy, test, and troubleshoot.
Use the complete source notes in build order, then pass the final checks before calling the project finished.
Build in functional stages
- Power and regulation
- Controller or processing stage
- Inputs and sensors
- Outputs and loads
- Enclosure and strain relief
Power up safely
- Inspect unpowered continuity first
- Apply the lowest safe current limit
- Measure supply rails before signals
- Add one load at a time
- Record expected and actual results
Work from simple to complex
- Confirm power, ground, polarity, and orientation
- Compare each pin with the source
- Test inputs separately from outputs
- Replace only one variable at a time
- Power off before every correction
Follow the documented instructions.
These notes come from this project's source and remain in their original order.
Project overview
Project build noteDisplay
This is a straightforward project for monitoring the indoor environment using an ESP32 and LCD panels. We are going to make use of an Indoor Environment Expansion board that has a DHT11 Temperature and Humidity Sensor as well as an SPG30 Air Quality Sensor installed on it. Measurements of CO2, TVOC, Temperature, and Humidity are taken with the Expansion Board. In the past, we measured the Indoor Air Quality with a BME680 Sensor. The LCD panel that is being utilized in this instance has a screen resolution of 320x480, a screen size of 3.5 inches, and an ILI9488 driver. It is essentially a TFT touch screen, but we are not going to make use of the touch function. Instead, we are going to use it as a colorful display. The first thing that we are going to do is make a lovely gauge that will show the current temperature, humidity, and CO2 levels. The three gauges will display whether there has been an increase or reduction in the pattern of circular widgets. As a second project, we will display the CO2 and TVOC values in a graphical way. This will be similar to the first project. The value of CO2 and TVOC will cause the graphs to either rise or fall, depending on the direction of the change. Indoor Environment Monitoring is a potential use for both the ESP32 and the TFT LCD Display.
Part Required
Project build noteESP32+TFT Touch Display ESP32 3.5" TFT Touch (Capacitive) with Camera Indoor Environment Expansion board SPG30 + DHT11 Sensor + Buzzer USB Cable Type-C USB Cable for Programming Connecting Wires Male to Female Jumper Wires
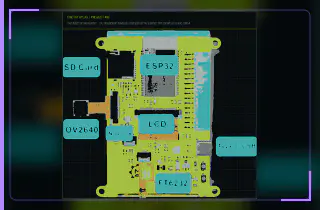
ESP32 3.5-Inch TFT Capacitive Touch Screen Display with Camera This stunning touchscreen display has a 3.5-inch screen, is powered by an ESP32-WROVER chip, and incorporates an OV2640 camera with 2 million pixels. The incorporation of all of these element’s results in the creation of an ideal platform for a variety of ESP32 applications and projects. The TFT LCD driver is essentially an ILI9488, and it measures 3.5 inches in size and has a screen resolution of 320 by 480 pixels. The ILI9488 LCD communicates with the ESP32 microcontroller via SPI (Serial Peripheral
Interface). Making the display smooth enough for videos may require the SPI main clock to be increased to between 60M and 80M. You are free to make use of any and all of these pins on the breakout connections while the camera is not being utilized. After that, you may utilize the ESP32 display for any Internet of Things application you want by connecting it to sensors or modules. Programming in Arduino and MicroPython are both supported by the ESP32 microcontroller. A micro-SD Card slot is provided on the board for the purpose of adding an external SD Card. Files and pictures can be saved to the SD Card and accessed whenever necessary. There is a USB Type-C port available, which functions as a USB to UART converter and can be used for ESP32 programming. You can directly upload the code to the board by connecting a Type-C data connection to it and then following the on-screen instructions.
Specification
Project build note1. Display with a resolution of 320x480 and a size of 3.5 inches 2. Touch that can be both capacitive and resistive 3. Controller for the ESP32-WROVER 4. Connection through WIFI and BLE. 5. Programmable ESP32 device with an integrated USB2UART converter 6. 2M pixel OV2640 Camera 7. OV2640 supports produce photos up to 2 million pixels 7. Amorphous-TFT-LCD display with a 3.5-inch diagonal for use in mobile phones and other portable electronic devices 8. LCD Driver: ILI9488 9. LCD Resolution: 320*480
10. A slot for a Micro SD card affixed to the board 11. A control circuit for a resistive touch screen using four wires NS2009 12. The FT6236 is a single-chip capacitive touch panel controller Integrated Circuit. 13. Power supply is a 5V USB Type-C connection ESP32 Touch Indoor Environment Expansion This is an expansion board for the ESP32 3.5 Touch Screen that is designed for use in an indoor environment. Through the usage of the extension connector, the ESP32 3.5 TFT touch can also serve the purpose of a hardware expansion. As a result of the Indoor environment expansion's integration of the temperature and humidity sensor DHT11 and the SGP30 Air Quality Sensor, which allows for the detection of CO2 and TVOC, you will be able to quickly develop an indoor environment detector. In addition to that, there is a buzzer located on board that can be used for the alarm. Installing Required Libraries on the Arduino Integrated Development Environment 1. TFT eSPI Library This is a TFT graphics library for Arduino processors, optimized for performance for STM32, ESP8266, and ESP32. The library is formatted specifically for use with 32-bit processors. The "Four wire" SPI and 8 bit parallel interfaces are both supported by it. Some TFT displays are supported by the library, and drivers are provided for them (ILI9163, ILI9225, ILI9341, ILI9488, ST7735, etc.).
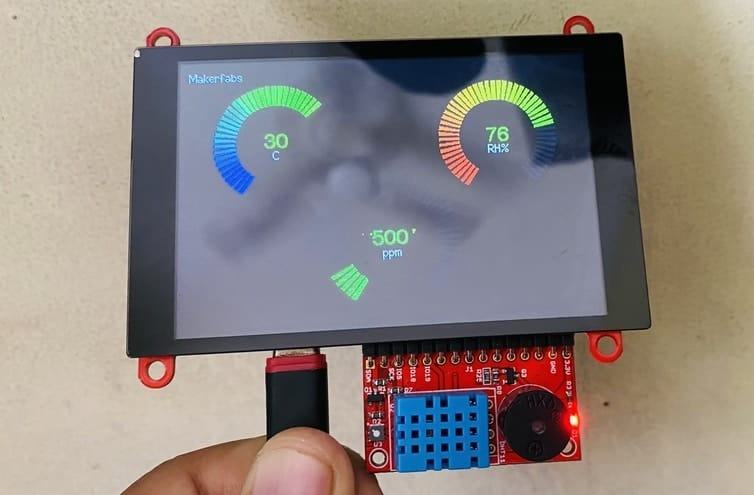
You will find a directory for the library on Github, from which you can download it. However, in order for our project to work properly, the library will need some modifications. Therefore, I present to you the revised version of the library. It is available for download, and you may put it in the library folder. 2. DHT11 Library We need a temperature humidity sensor of some kind so that we can read the temperature and the humidity. The DHT11 is the best and most affordable sensor for this purpose. In order to do that, we need to install the DHT11 Library. You can add the library to the Arduino IDE by downloading it from the link below. 3. Adafruit SPG30 Library SPG30 Sensor is required in order for us to read the environmental CO2 & TVOC Data. The Adafruit SGP30 Gas/Air Quality I2C sensor library can detect both total volatile organic compound and equivalent carbondioxide. Indoor Environment Monitoring on Gauge Let's utilize the ESP32 and LCD Screen to monitor the environment inside the building. The value of the temperature, humidity, and CO2 level will be displayed on the LCD Screen in the form of a Gauge. After you have connected the Type-C USB Cable to the ESP32 Board, you can then upload the code. After the code has been uploaded, you will need to press the reset button. After that, you will see three separate widgets or gauges displaying the data of the temperature, humidity, and CO2 levels.
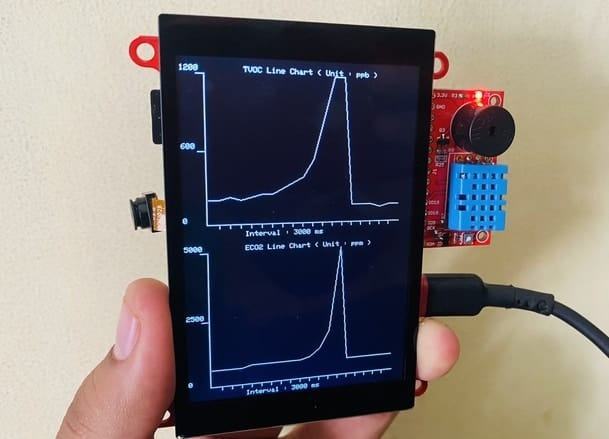
Monitoring of CO2 and TVOC Historical Data Displayed in Graph Let's use the ESP32 and the LCD screen to monitor the CO2 and TVOC levels once more. Graphical representations of the CO2 and TVOC levels will be shown on the LCD screen as they are measured. in order to allow you to keep track of the historical data.
Repeat the uploading of the code. After the code has been uploaded, you will need to press the reset button. After that, graphical display data of CO2 and TVOC will be shown to you.
You built Monitoring the Indoor Environment Using an ESP32 and an LCD Display.
You followed the full workflow from understanding the mission to testing the finished project. That is a real engineering achievement - well done.
Measure Wind Speed with Anemometer on ESP32 TFT Display
Ready to reuse what you learned in another project from the same track?
Start this project →