IoT Based Soil Nutrient Monitoring with Arduino & ESP32
In this project, Arduino and ESP32 will be used to learn about IoT-based soil nutrient monitoring and analysis systems. Agriculture relies heavily on healthy soil. The nutrients that are…
Know the mission before touching a wire.
Understand what you are making, prepare the right tools, and make the workbench safe.
Project details
IoT Based Soil Nutrient Monitoring with Arduino & ESP32 is a iot project. In this project, Arduino and ESP32 will be used to learn about IoT-based soil nutrient monitoring and analysis systems. Agriculture relies heavily on healthy soil. The nutrients that are…
- Source pages
- 1442-1454
- Named parts
- 19
- Build goal
- Working, tested prototype
Tools you need
- Digital multimeter
- Wire stripper and side cutters
- Soldering iron with a fine tip
- Current-limited bench supply
- Computer with a data-capable USB cable
Use eye protection, good lighting, and a clean insulated surface throughout the build.
Safety precautions
- Disconnect every power source before changing a connection.
- Check component polarity, pinout, and supply voltage twice.
- Use a current limit for the first power-up.
- Keep liquids, loose metal, and uninsulated wires away from the bench.
Gather, identify, and understand every part.
Use the standardized inventory, then open What's this? to learn each part's role, advantages, limitations, handling, and specifications.
What's this?Image, role, pros, cons, handling & specifications
 MODULE LEARNING VIEW
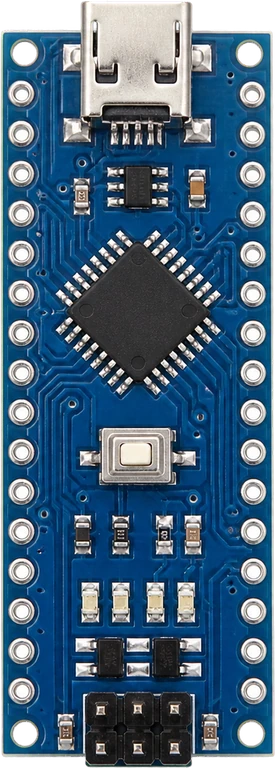
Arduino Board - Arduino Nano
A programmable controller that reads inputs, makes decisions, and drives the project's outputs.
What it does hereIt is the control centre and must use the documented board, pin map, supply, and logic level.
Buy / compare this part ↗Advantages
- Reprogrammable and reusable
- Large learning ecosystem
- Complex behaviour remains changeable
Limitations
- GPIO voltage and current are limited
- Some pins affect boot or communication
- Loads normally need a driver
Handling
- Disconnect power before rewiring
- Avoid static discharge
- Never power motors, relays, or pumps directly from GPIO
Specifications to verify
- Use the exact model, value, package, and rating listed for Arduino Board - Arduino Nano; similar-looking parts are not always interchangeable.
- Confirm operating voltage, logic level, pinout, memory, USB interface, and maximum GPIO current.
What's this?Image, role, pros, cons, handling & specifications
ESP32 Board ESP32 ESP-32S Development Board
A programmable controller that reads inputs, makes decisions, and drives the project's outputs.
What it does hereIt is the control centre and must use the documented board, pin map, supply, and logic level.
Buy / compare this part ↗Advantages
- Reprogrammable and reusable
- Large learning ecosystem
- Complex behaviour remains changeable
Limitations
- GPIO voltage and current are limited
- Some pins affect boot or communication
- Loads normally need a driver
Handling
- Disconnect power before rewiring
- Avoid static discharge
- Never power motors, relays, or pumps directly from GPIO
Specifications to verify
- Use the exact model, value, package, and rating listed for ESP32 Board ESP32 ESP-32S Development Board; similar-looking parts are not always interchangeable.
- Confirm operating voltage, logic level, pinout, memory, USB interface, and maximum GPIO current.
What's this?Image, role, pros, cons, handling & specifications
NR24L01 Module NRF24L01 PA+LNA 2.4gHz - Wireless
A named project component whose exact role is defined by the source circuit and build guide.
What it does hereIt performs a documented electrical, control, interface, or construction function in this project.
Buy / compare this part ↗Advantages
- Selected for this project
- Can be checked independently
- Supports modular troubleshooting
Limitations
- Substitutes may differ
- Generic names can hide variants
- Pinouts and ratings vary
Handling
- Compare the received part with the source
- Keep it labelled
- Do not force connectors or adjusters
Specifications to verify
- Use the exact model, value, package, and rating listed for NR24L01 Module NRF24L01 PA+LNA 2.4gHz - Wireless; similar-looking parts are not always interchangeable.
- Confirm dimensions, ratings, connection method, polarity, and environmental limits.
What's this?Image, role, pros, cons, handling & specifications
Transceiver Module
A named project component whose exact role is defined by the source circuit and build guide.
What it does hereIt performs a documented electrical, control, interface, or construction function in this project.
Buy / compare this part ↗Advantages
- Selected for this project
- Can be checked independently
- Supports modular troubleshooting
Limitations
- Substitutes may differ
- Generic names can hide variants
- Pinouts and ratings vary
Handling
- Compare the received part with the source
- Keep it labelled
- Do not force connectors or adjusters
Specifications to verify
- Use the exact model, value, package, and rating listed for Transceiver Module; similar-looking parts are not always interchangeable.
- Confirm dimensions, ratings, connection method, polarity, and environmental limits.
What's this?Image, role, pros, cons, handling & specifications
NPK Sensor - JXIOT Soil NPK Sensor
A sensor converts a physical condition into an electrical signal the circuit can measure.
What it does hereIt provides project input as an analogue, digital, resistive, frequency, or calibrated signal.
Buy / compare this part ↗Advantages
- Adds real-world awareness
- Can usually be tested independently
- Often supports calibration
Limitations
- Readings can drift
- Placement affects results
- Some sensors need warm-up or calibration
Handling
- Protect the sensing surface
- Observe supply voltage and polarity
- Keep signal leads away from noisy power wiring
Specifications to verify
- Use the exact model, value, package, and rating listed for NPK Sensor - JXIOT Soil NPK Sensor; similar-looking parts are not always interchangeable.
- Confirm supply range, output type, measurement range, accuracy, response time, and pin order.
What's this?Image, role, pros, cons, handling & specifications
Soil Moisture Sensor - Capacitive Soil Moisture Sensor v2.0
A sensor converts a physical condition into an electrical signal the circuit can measure.
What it does hereIt provides project input as an analogue, digital, resistive, frequency, or calibrated signal.
Buy / compare this part ↗Advantages
- Adds real-world awareness
- Can usually be tested independently
- Often supports calibration
Limitations
- Readings can drift
- Placement affects results
- Some sensors need warm-up or calibration
Handling
- Protect the sensing surface
- Observe supply voltage and polarity
- Keep signal leads away from noisy power wiring
Specifications to verify
- Use the exact model, value, package, and rating listed for Soil Moisture Sensor - Capacitive Soil Moisture Sensor v2.0; similar-looking parts are not always interchangeable.
- Confirm supply range, output type, measurement range, accuracy, response time, and pin order.
What's this?Image, role, pros, cons, handling & specifications
Temperature Sensor - DS18B20 Waterproof Temperature Sensor
A sensor converts a physical condition into an electrical signal the circuit can measure.
What it does hereIt provides project input as an analogue, digital, resistive, frequency, or calibrated signal.
Buy / compare this part ↗Advantages
- Adds real-world awareness
- Can usually be tested independently
- Often supports calibration
Limitations
- Readings can drift
- Placement affects results
- Some sensors need warm-up or calibration
Handling
- Protect the sensing surface
- Observe supply voltage and polarity
- Keep signal leads away from noisy power wiring
Specifications to verify
- Use the exact model, value, package, and rating listed for Temperature Sensor - DS18B20 Waterproof Temperature Sensor; similar-looking parts are not always interchangeable.
- Confirm supply range, output type, measurement range, accuracy, response time, and pin order.
What's this?Image, role, pros, cons, handling & specifications
Modbus Module - MAX485 Modbus
A named project component whose exact role is defined by the source circuit and build guide.
What it does hereIt performs a documented electrical, control, interface, or construction function in this project.
Buy / compare this part ↗Advantages
- Selected for this project
- Can be checked independently
- Supports modular troubleshooting
Limitations
- Substitutes may differ
- Generic names can hide variants
- Pinouts and ratings vary
Handling
- Compare the received part with the source
- Keep it labelled
- Do not force connectors or adjusters
Specifications to verify
- Use the exact model, value, package, and rating listed for Modbus Module - MAX485 Modbus; similar-looking parts are not always interchangeable.
- Confirm dimensions, ratings, connection method, polarity, and environmental limits.
What's this?Image, role, pros, cons, handling & specifications
 PASSIVE LEARNING VIEW
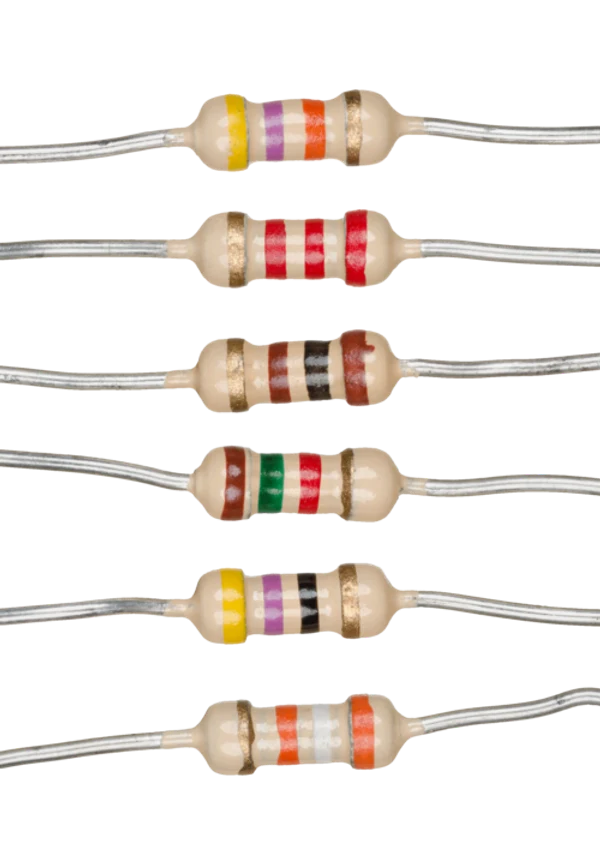
Resistor 4.7K Resistor
A passive component sets current, voltage, timing, filtering, or signal behaviour without adding gain.
What it does hereIts exact value and tolerance determine how the surrounding stage behaves.
Buy / compare this part ↗Advantages
- Simple and dependable
- Low cost
- Easy to measure before installation
Limitations
- A wrong value can stop or damage the circuit
- Ratings must not be exceeded
- Polarized parts require correct orientation
Handling
- Measure unclear values
- Observe capacitor polarity
- Avoid overheating leads while soldering
Specifications to verify
- Use the exact model, value, package, and rating listed for Resistor 4.7K Resistor; similar-looking parts are not always interchangeable.
- Confirm value, tolerance, power or voltage rating, polarity, and package size.
What's this?Image, role, pros, cons, handling & specifications
 POWER LEARNING VIEW
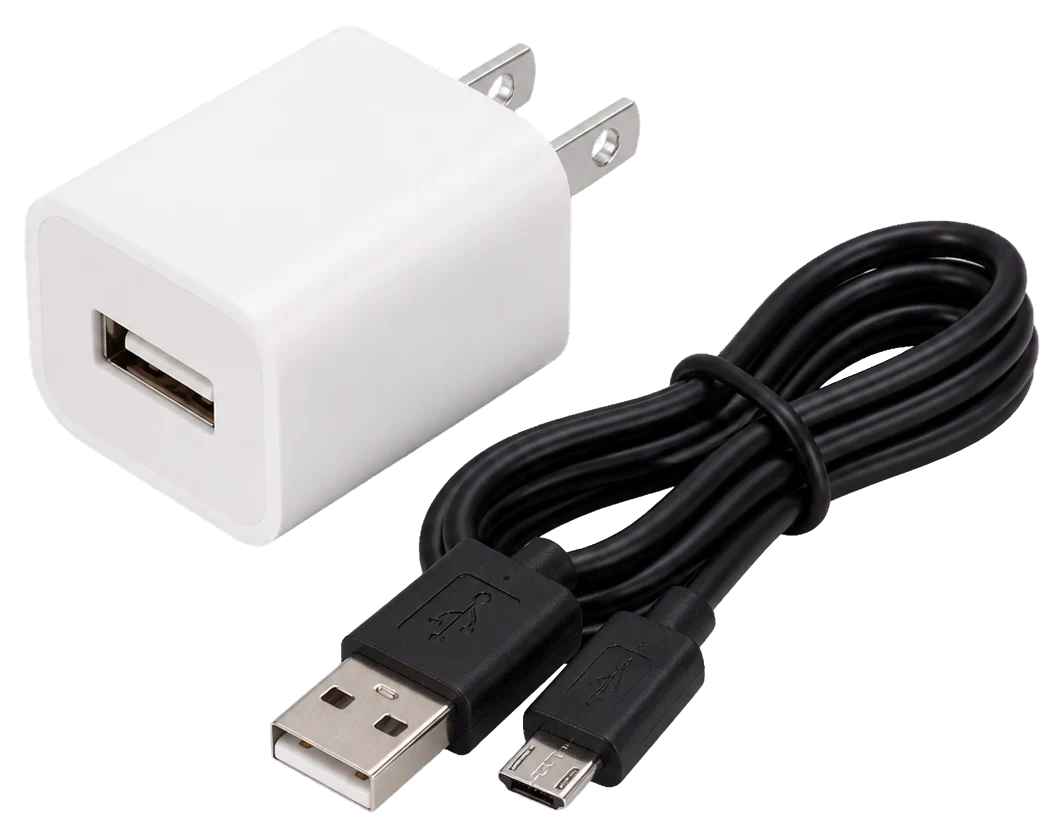
Power Supply - 9V - 12V DC Supply
A power component supplies, converts, stores, or regulates energy for the project.
What it does hereIt must provide the documented voltage, polarity, isolation, and sufficient current safely.
Buy / compare this part ↗Advantages
- Stable power improves reliability
- Current limiting protects first tests
- Regulation reduces resets and noise
Limitations
- Wrong polarity can cause immediate damage
- Underrated parts overheat
- Mains circuits require qualified supervision
Handling
- Measure output before connection
- Use a fuse or current limit
- Insulate exposed conductors
Specifications to verify
- Use the exact model, value, package, and rating listed for Power Supply - 9V - 12V DC Supply; similar-looking parts are not always interchangeable.
- Confirm input/output voltage, current, polarity, connector, isolation, and thermal rating.
What's this?Image, role, pros, cons, handling & specifications
Sensors Used: Soil Moisture, Temperature & NPK
A named project component whose exact role is defined by the source circuit and build guide.
What it does hereIt performs a documented electrical, control, interface, or construction function in this project.
Buy / compare this part ↗Advantages
- Selected for this project
- Can be checked independently
- Supports modular troubleshooting
Limitations
- Substitutes may differ
- Generic names can hide variants
- Pinouts and ratings vary
Handling
- Compare the received part with the source
- Keep it labelled
- Do not force connectors or adjusters
Specifications to verify
- Use the exact model, value, package, and rating listed for Sensors Used: Soil Moisture, Temperature & NPK; similar-looking parts are not always interchangeable.
- Confirm dimensions, ratings, connection method, polarity, and environmental limits.
What's this?Image, role, pros, cons, handling & specifications
Capacitive Soil Moisture Sensor
A sensor converts a physical condition into an electrical signal the circuit can measure.
What it does hereIt provides project input as an analogue, digital, resistive, frequency, or calibrated signal.
Buy / compare this part ↗Advantages
- Adds real-world awareness
- Can usually be tested independently
- Often supports calibration
Limitations
- Readings can drift
- Placement affects results
- Some sensors need warm-up or calibration
Handling
- Protect the sensing surface
- Observe supply voltage and polarity
- Keep signal leads away from noisy power wiring
Specifications to verify
- Use the exact model, value, package, and rating listed for Capacitive Soil Moisture Sensor; similar-looking parts are not always interchangeable.
- Confirm supply range, output type, measurement range, accuracy, response time, and pin order.
What's this?Image, role, pros, cons, handling & specifications
DS18B20 Waterproof Temperature Sensor
A sensor converts a physical condition into an electrical signal the circuit can measure.
What it does hereIt provides project input as an analogue, digital, resistive, frequency, or calibrated signal.
Buy / compare this part ↗Advantages
- Adds real-world awareness
- Can usually be tested independently
- Often supports calibration
Limitations
- Readings can drift
- Placement affects results
- Some sensors need warm-up or calibration
Handling
- Protect the sensing surface
- Observe supply voltage and polarity
- Keep signal leads away from noisy power wiring
Specifications to verify
- Use the exact model, value, package, and rating listed for DS18B20 Waterproof Temperature Sensor; similar-looking parts are not always interchangeable.
- Confirm supply range, output type, measurement range, accuracy, response time, and pin order.
What's this?Image, role, pros, cons, handling & specifications
sheathing around it. These 1-wire digital temperature sensors have an
A named project component whose exact role is defined by the source circuit and build guide.
What it does hereIt performs a documented electrical, control, interface, or construction function in this project.
Buy / compare this part ↗Advantages
- Selected for this project
- Can be checked independently
- Supports modular troubleshooting
Limitations
- Substitutes may differ
- Generic names can hide variants
- Pinouts and ratings vary
Handling
- Compare the received part with the source
- Keep it labelled
- Do not force connectors or adjusters
Specifications to verify
- Use the exact model, value, package, and rating listed for sheathing around it. These 1-wire digital temperature sensors have an; similar-looking parts are not always interchangeable.
- Confirm dimensions, ratings, connection method, polarity, and environmental limits.
What's this?Image, role, pros, cons, handling & specifications
NPK Sensor
A sensor converts a physical condition into an electrical signal the circuit can measure.
What it does hereIt provides project input as an analogue, digital, resistive, frequency, or calibrated signal.
Buy / compare this part ↗Advantages
- Adds real-world awareness
- Can usually be tested independently
- Often supports calibration
Limitations
- Readings can drift
- Placement affects results
- Some sensors need warm-up or calibration
Handling
- Protect the sensing surface
- Observe supply voltage and polarity
- Keep signal leads away from noisy power wiring
Specifications to verify
- Use the exact model, value, package, and rating listed for NPK Sensor; similar-looking parts are not always interchangeable.
- Confirm supply range, output type, measurement range, accuracy, response time, and pin order.
What's this?Image, role, pros, cons, handling & specifications
sensor has excellent interchangeability, a high measurement accuracy, a
A sensor converts a physical condition into an electrical signal the circuit can measure.
What it does hereIt provides project input as an analogue, digital, resistive, frequency, or calibrated signal.
Buy / compare this part ↗Advantages
- Adds real-world awareness
- Can usually be tested independently
- Often supports calibration
Limitations
- Readings can drift
- Placement affects results
- Some sensors need warm-up or calibration
Handling
- Protect the sensing surface
- Observe supply voltage and polarity
- Keep signal leads away from noisy power wiring
Specifications to verify
- Use the exact model, value, package, and rating listed for sensor has excellent interchangeability, a high measurement accuracy, a; similar-looking parts are not always interchangeable.
- Confirm supply range, output type, measurement range, accuracy, response time, and pin order.
What's this?Image, role, pros, cons, handling & specifications
NRF24L01 Wireless Transceiver Module
A named project component whose exact role is defined by the source circuit and build guide.
What it does hereIt performs a documented electrical, control, interface, or construction function in this project.
Buy / compare this part ↗Advantages
- Selected for this project
- Can be checked independently
- Supports modular troubleshooting
Limitations
- Substitutes may differ
- Generic names can hide variants
- Pinouts and ratings vary
Handling
- Compare the received part with the source
- Keep it labelled
- Do not force connectors or adjusters
Specifications to verify
- Use the exact model, value, package, and rating listed for NRF24L01 Wireless Transceiver Module; similar-looking parts are not always interchangeable.
- Confirm dimensions, ratings, connection method, polarity, and environmental limits.
What's this?Image, role, pros, cons, handling & specifications
further information regarding this NRF24L01 Module
A named project component whose exact role is defined by the source circuit and build guide.
What it does hereIt performs a documented electrical, control, interface, or construction function in this project.
Buy / compare this part ↗Advantages
- Selected for this project
- Can be checked independently
- Supports modular troubleshooting
Limitations
- Substitutes may differ
- Generic names can hide variants
- Pinouts and ratings vary
Handling
- Compare the received part with the source
- Keep it labelled
- Do not force connectors or adjusters
Specifications to verify
- Use the exact model, value, package, and rating listed for further information regarding this NRF24L01 Module; similar-looking parts are not always interchangeable.
- Confirm dimensions, ratings, connection method, polarity, and environmental limits.
What's this?Image, role, pros, cons, handling & specifications
MODULE LEARNING VIEWArduino Nano Board, several sensors, and the NRF24L01 Transceiver
A programmable controller that reads inputs, makes decisions, and drives the project's outputs.
What it does hereIt is the control centre and must use the documented board, pin map, supply, and logic level.
Buy / compare this part ↗Advantages
- Reprogrammable and reusable
- Large learning ecosystem
- Complex behaviour remains changeable
Limitations
- GPIO voltage and current are limited
- Some pins affect boot or communication
- Loads normally need a driver
Handling
- Disconnect power before rewiring
- Avoid static discharge
- Never power motors, relays, or pumps directly from GPIO
Specifications to verify
- Use the exact model, value, package, and rating listed for Arduino Nano Board, several sensors, and the NRF24L01 Transceiver; similar-looking parts are not always interchangeable.
- Confirm operating voltage, logic level, pinout, memory, USB interface, and maximum GPIO current.
Connect one verified path at a time.
Explore the named components and standardized signal flow, then use Source Check to verify exact physical pins, values, and topology before applying power.
Trace this circuit.
IoT Based Soil Nutrient Monitoring with Arduino & ESP32: interactive parts, standardized terminals, responsive anchored wires, student explanations, and the original circuit reference in one shared system.
Trace before wiring
Follow power, ground, inputs, processing, and outputs in that order. Never guess a pin from package shape alone.
Connect with power off
Make short, labelled connections and share a common ground only where the schematic requires it.
Inspect every joint
Check continuity, polarity, adjacent shorts, and loose connections before the first power-up.
Open all source diagrams and build views 10 visuals
Confirm the hardware-only control path.
This project does not include firmware in the source. The circuit itself provides the required behaviour.
How to connect
- Match every controller label to the circuit view and source pin map.
- Join grounds before signal wires when separate low-voltage supplies are used.
- Keep motors, relays, pumps, and other loads on a suitable driver and external supply.
Common mistakes
Reversed VCC/GND, board-label versus GPIO-number confusion, missing common ground, and charge-only USB cables.
Troubleshoot
Disconnect loads, continuity-test one path at a time, then test with a current limit.
Software preparation
No IDE, board package, library, or firmware upload is required for this project.
If you add a programmable controller as an extension, document its pin map separately.
How to upload code
The original design is implemented entirely in hardware, so proceed after verifying the circuit and supply.
Assemble, deploy, test, and troubleshoot.
Use the complete source notes in build order, then pass the final checks before calling the project finished.
Build in functional stages
- Power and regulation
- Controller or processing stage
- Inputs and sensors
- Outputs and loads
- Enclosure and strain relief
Power up safely
- Inspect unpowered continuity first
- Apply the lowest safe current limit
- Measure supply rails before signals
- Add one load at a time
- Record expected and actual results
Work from simple to complex
- Confirm power, ground, polarity, and orientation
- Compare each pin with the source
- Test inputs separately from outputs
- Replace only one variable at a time
- Power off before every correction
Follow the documented instructions.
These notes come from this project's source and remain in their original order.
Project overview
Project build noteIn this project, Arduino and ESP32 will be used to learn about IoT-based soil nutrient monitoring and analysis systems. Agriculture relies heavily on healthy soil. The nutrients that are provided by the soil contribute to the
overall growth of a crop. A crop's production is highly influenced by a number of the soil's chemical and physical features, including its moisture level, temperature, and the proportions of nitrogen, phosphorus, and potassium present in the soil. The open-source hardware has the capability of sensing these features, and this information may then be applied in the field. A system for the monitoring and analysis of soil nutrients, such as nitrogen, phosphorus, and potassium, is one of the things that is going to be worked on as part of this project. The farmer will be able to use this system to monitor the temperature and moisture of the soil as well as the nutrient content of the soil. All of these parameters can be monitored wirelessly on the farmer's mobile phone or on the computer system. We are going to employ a capacitive soil moisture sensor in order to get an accurate reading of the soil's moisture content. Using the DS18B20 Waterproof Temperature Sensor, one is able to get an accurate reading of the temperature of the ground. In a similar vein, we will make use of a Soil NPK Sensor in order to determine the NPK values of the soil. The Arduino board is compatible with all of these sensors, making it simple to interface with them. We are going to monitor the data using the graphical and numerical formats provided by the Thingspeak Server. In order to transfer the data to the server, we need to be connected to a GSM or WiFi network in the field. The agricultural industry, on the other hand, does not have access to these networks. In order to find a solution to this problem, we will be utilizing the NRF2401 Wireless transceiver Module to transmit the data from the sensor Node to the Gateway.
It is possible for the data sent by the transmitter to be wirelessly relayed to the receiver from a distance of one kilometer. The ESP32 WiFi Module, which has access to the WiFi Network, is used in the construction of the receiver. The data can be sent to the Thingspeak Server if the user connects their device to this WiFi Network. Therefore, let's create an Internet of Things-based system for analyzing, monitoring, and testing the nutrient content of soil using nothing more than a wireless sensor network, Arduino, and ESP32.
Component Required
Project build noteArduino Board - Arduino Nano ESP32 Board ESP32 ESP-32S Development Board NR24L01 Module NRF24L01 PA+LNA 2.4gHz - Wireless Transceiver Module NPK Sensor - JXIOT Soil NPK Sensor Soil Moisture Sensor - Capacitive Soil Moisture Sensor v2.0 Temperature Sensor - DS18B20 Waterproof Temperature Sensor Modbus Module - MAX485 Modbus
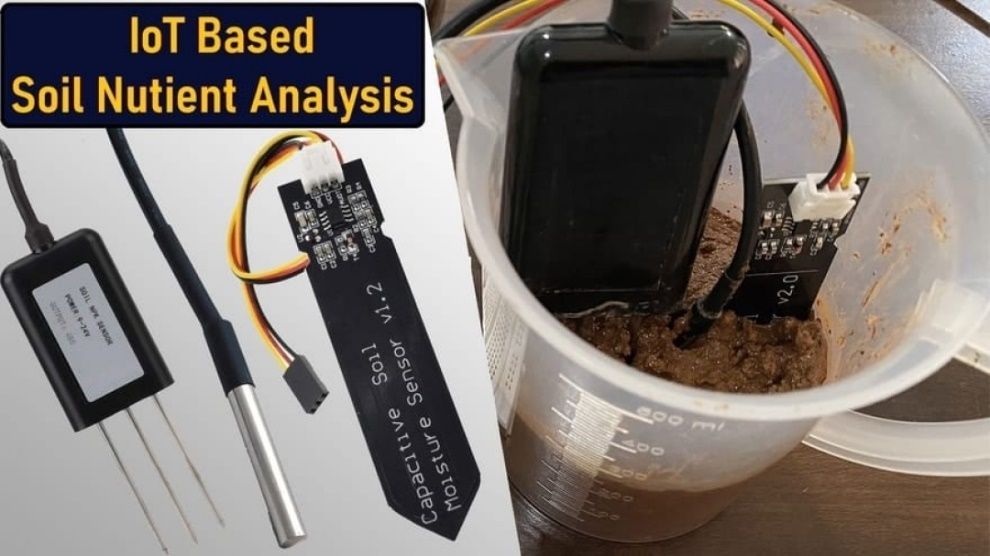
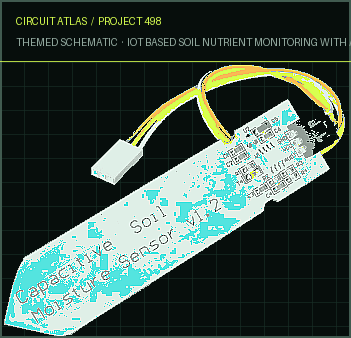
Resistor 4.7K Resistor Power Supply - 9V - 12V DC Supply Connecting Wires Breadboard Sensors Used: Soil Moisture, Temperature & NPK The IoT-based soil Nutrient Monitoring, Analysis, and Testing project calls for a few sensors, which will be discussed in further depth in the following paragraphs. Capacitive Soil Moisture Sensor We need a Soil Moisture Sensor in order to measure the amount of moisture in the soil. It has been determined that a capacitive variety of soil moisture sensor is the most suitable for this purpose. We will be using an analogous capacitive soil moisture sensor that utilizes capacitive sensing in order to determine the amounts of soil moisture. What this indicates is that the capacitance shifts depending on the amount of water that is present in the soil. The capacitance that was measured was transformed into a voltage level that ranged from a minimum of 1.2V to a maximum of 3.0V. Because they are constructed out of a material that is resistant to corrosion, capacitive soil moisture sensors have a long service life. This is one of the sensors' primary advantages.
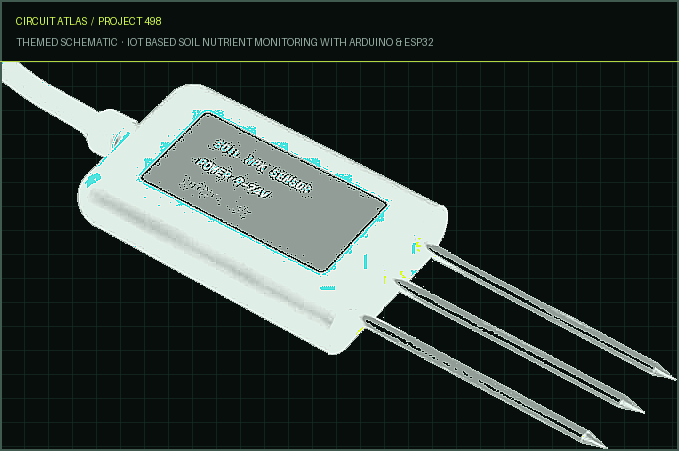
The Capacitive Soil Moisture Sensor v2.0 is capable of functioning with a DC voltage range of 3.3V-5.5V. The output is in the form of analog signals up to a maximum of 3V. The output voltage can be converted into a percentage value by using this method. DS18B20 Waterproof Temperature Sensor This version of the DS18B20 Sensor is pre-wired and waterproofed, making it suitable for use when measuring anything at a great distance or in damp environments. The Temperature Sensor has a measuring range of -55 to 125 degrees Celsius (-267 to +257 degrees Fahrenheit). The cable has a PVC sheathing around it. These 1-wire digital temperature sensors have an accuracy of 0.5 degrees Celsius over most of their measuring range. They work wonderfully with any microcontroller that just has one digital pin available. The sensor calls for two different libraries, namely the One-Wire Library and the Dallas Temperature Sensor Library. When utilizing the sensor, it is necessary to have a pullup resistor of 4.7k, which is required to be connected from the DATA line to the VCC line. NPK Sensor The soil NPK sensor is an instrument that can be utilized for the purpose of determining the levels of nitrogen, phosphorous, and potassium present in the ground. It contributes to the process of figuring out how fertile the soil is. The sensor is designed to withstand prolonged submersion in the ground.
The sensor does not need any chemical reagent to function properly. The sensor has excellent interchangeability, a high measurement accuracy, a quick reaction speed, and it can be used with any microcontroller. You will need any Modbus Module, such as RS485 or MAX485, in order to read the NPK Data. The Microcontroller as well as the Sensor are both connected to the Modbus module. The sensor can handle 9-24V of power. The sensor's precision can be as high as 2% of the reading. The resolution of the measurement system for nitrogen, phosphorous, and potassium is up to 1 mg/kg (mg/l). NRF24L01 Wireless Transceiver Module Because the nRF24L01 is a wireless transceiver module, each individual module has the capacity to both transmit and receive data. It functions at a frequency of 2.4 gigahertz (GHz). A distance of one hundred meters can be traversed by the modules if they are operated effectively. The second iteration of this module, which is known as the nRF24L01 PA+LNA, is equipped with a SMA connector, a duck-antenna, and a unique RFX2401C chip that integrates the PA with the LNA. The module is able to reach a substantially higher broadcast range of approximately one kilometer with the assistance of this range extender chip, in addition to a duck antenna. The operating voltage of the module is 3.3V, but the SPI pins can tolerate up to 5V. Because the NRF24L01 module functions with the assistance of SPI communications, it is compatible with any microcontroller that has SPI Pins, such as the ESP32 WiFi Module or Arduino Boards. To acquire further information regarding this NRF24L01 Module
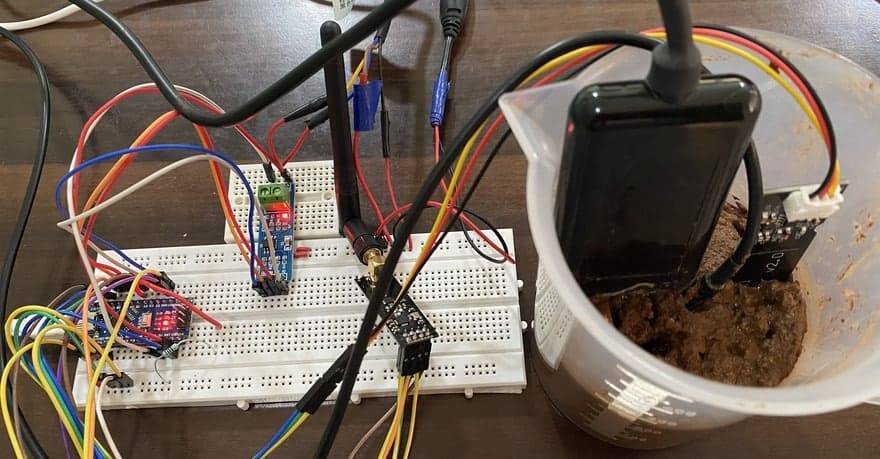
Let's talk about our project now, which is called Internet of Things-Based Soil Nutrient Monitoring with Arduino and ESP32. In order to accomplish that, we will need to construct two separate circuits. The singular circuit is referred to as a Sensor Node, and it is constructed by combining the Arduino Nano Board, several sensors, and the NRF24L01 Transceiver Module.
Circuit Diagram
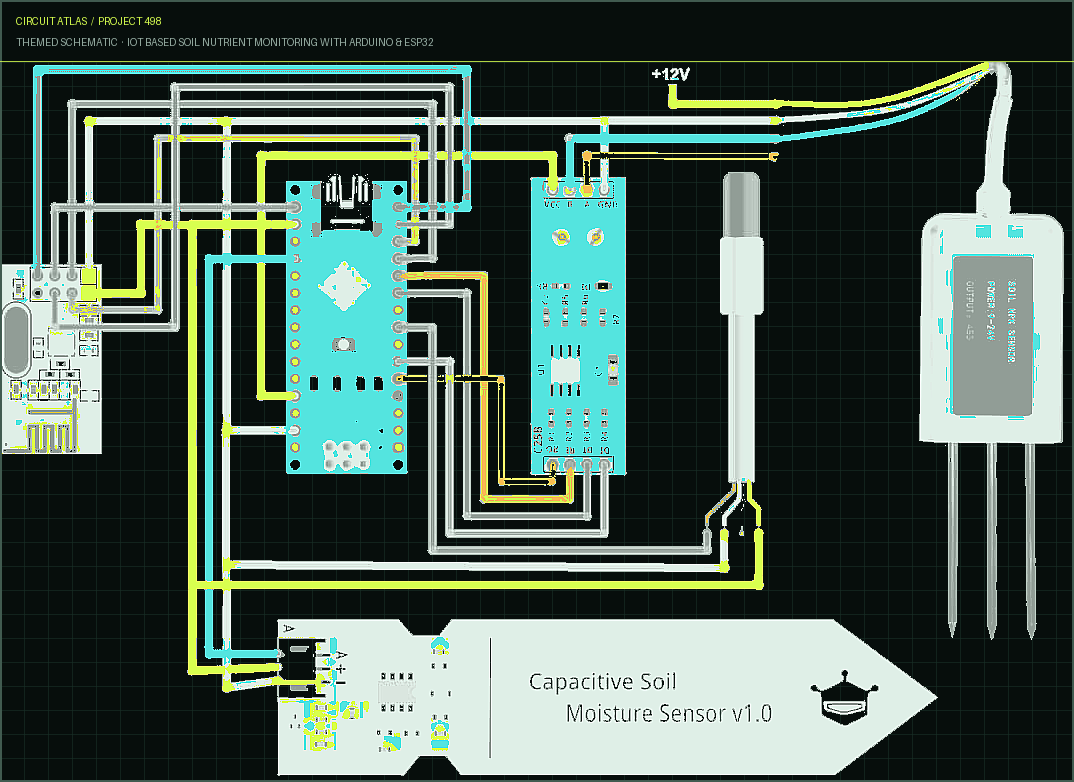
Project build noteTogether, the ESP32 WiFi Module and the NRF24L01 Transceiver Module made up the gateway component that we developed. The data is sent from the Sensor Node to the Gateway, and from there it is uploaded to the Thingspeak Server by the Gateway. The circuit for the sensor node as well as its connection diagram are presented below. The Arduino Nano Board, the NRF24L01 Transceiver
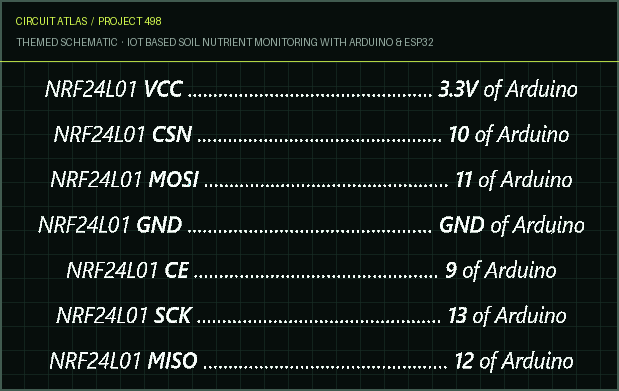
Module, the Soil Moisture Sensor, the DS18B20 Temperature Sensor, and the Soil NPK Sensor are the components that make up the Sensor Node. The connection between NRF24L01 & Arduino Nano Board is given below. The sensors are linked to the analog and digital pins of the Arduino board in addition to the NRF24L01 Arduino Connections. Analog pin A0 of the Arduino is connected to the capacitive soil moisture sensor's analog output. In a similar manner, the DS18B20 sensor is linked to the D5 pin on the Arduino. And the NPK Sensor is linked to the Arduino board by way of the Modbus Pin being attached to the 2,3,7,8 Pin on the Arduino. The NPK Sensor can operate on voltages between 9V and 24V. Therefore, the circuit requires an additional supply of power. The Arduino 5V/3.3V Pin is an option for powering the remaining components of the circuit. Gateway Circuit The Gateway is a component of both the Internet of Things-based soil nutrient content analysis and monitoring. The ESP32 WiFi Module and the NRF24L01 Wireless Transceiver Module were used in the construction of the Gateway.
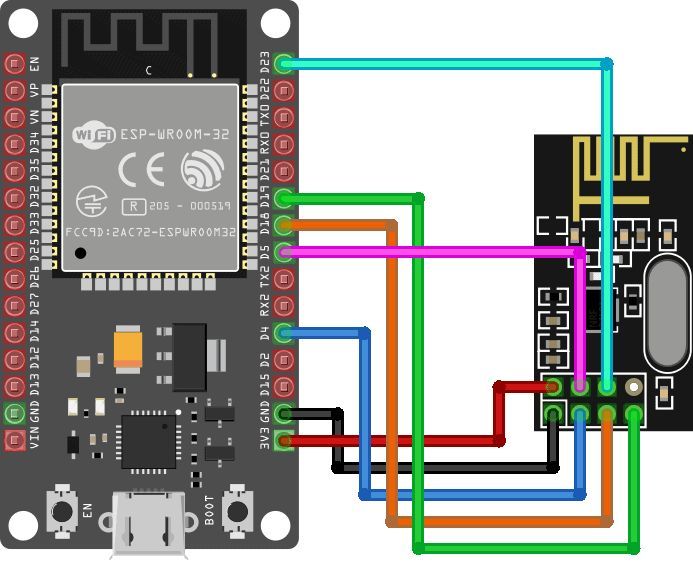
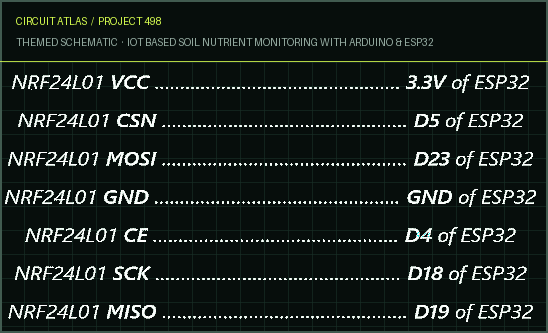
The diagram below illustrates the connection that should be made between the ESP32 Board and the NRF24L01 Wireless Transceiver Module.
Setting Up Thingspeak Server
Project build noteThingspeak Server is utilized in order to carry out the IoT-based IoT soil nutrient monitoring and analysis. Consequently, we are going to have to set up the Thingspeak account. In order to get Thingspeak up and running,
follow these steps
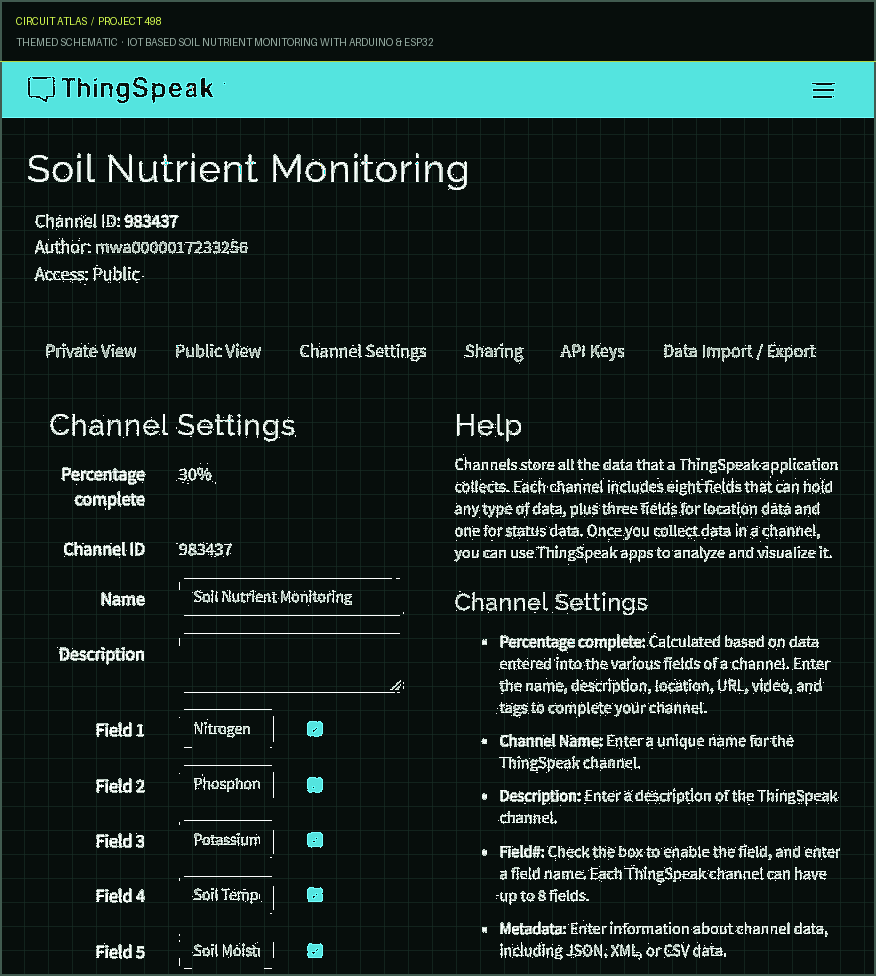
Project build noteStep 1: Go to https://thingspeak.com/ and establish an account for yourself by filling in the required information. Step 2: To set up a new channel, click the "Channel" button and then fill in
the information requested, which is depicted in the following image
Project build noteStep 3: After clicking on API Key, a window titled "Write API Key" will appear. Make sure to copy the API Key. This is quite significant, and it will be necessary in the Code Part. Step 4: If you wish to make any adjustments to the display window, you can do so by selecting the "Private View" option. Adding Necessary Library to Arduino IDE
1. NRF24L01 Library This library was developed to have the highest possible level of compliance with the functions that are meant to be performed by the nRF24L01 2.4GHz Wireless Transceiver Module. The SPI bus, in addition to two-chip control pins, are utilized by this chip. 2. RH24 Library For embedded microprocessors, this is the RadioHead Packet Radio library. It offers a comprehensive object-oriented library that can send and receive packetized messages on a wide variety of embedded microprocessors using a variety of standard data radios and other transports. 3. One Wire Library You are able to access 1-wire devices manufactured by Maxim/Dallas using the OneWire library. Some examples of these devices include DS18B20 Temperature sensors. OneWire calls for the use of a single pull-up resistor with a value of 4.7K to be connected between the pin and the power source. 4. Dallas Temperature Sensor Library This is the Maxim Temperature Integrated Circuits Arduino Library that can be used with Arduino. The DS18B20, DS1822, DS1820, and MAX31820 are all supported by this library. Because the Dallas 1-Wire protocol is relatively complicated, a significant amount of coding is required in order to decipher the transmission. In order to obtain temperature measurements from the sensor, the Dallas Temperature Sensor Library is able to provide straightforward commands. IoT Based Soil Nutrient Monitoring, Testing & Results
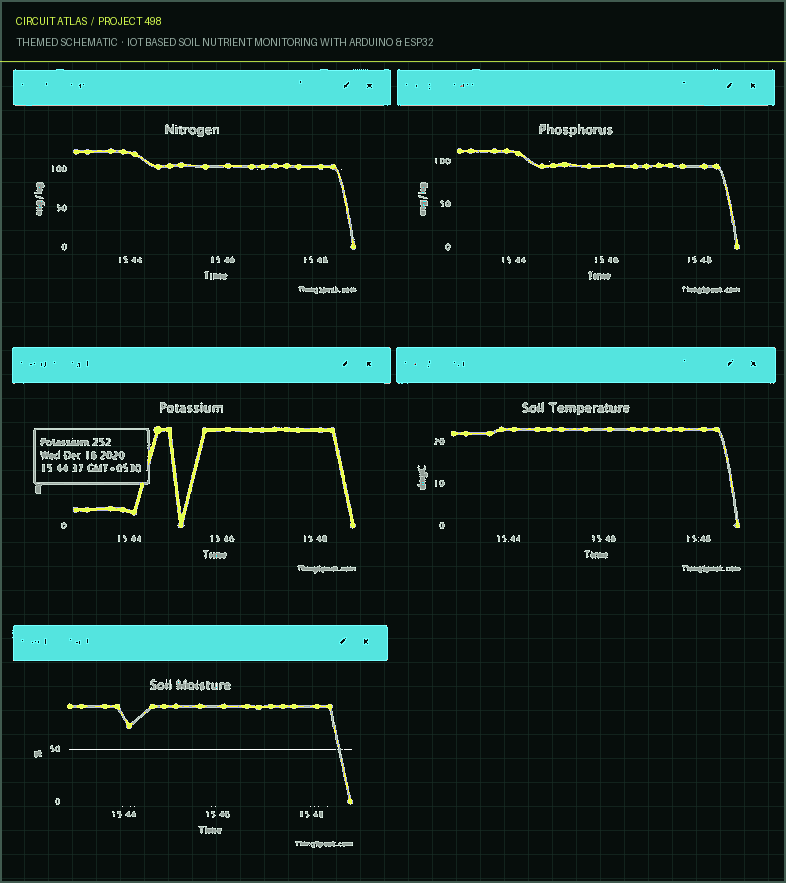
You are free to begin testing the gadget as soon as you have successfully uploaded the code to the Arduino & ESP32 Board. Now, launch both the Serial Monitor and the Process Monitor to determine whether or not the data transmission is taking place. The data that was read from the sensor is displayed on the Serial Monitor that is located on the sensor node. This includes the value of the soil moisture measured in %, the temperature measured in degrees Celsius, and the NPK Content measured in mg/kg. The data is sent in a wireless transmission to the portion that serves as the receiver and gateway. The information is gathered by the gateway, which then transmits it to the Thingspeak Server. Simply navigate to the private view of the Thingspeak Dashboard in your web browser. You will have access to the information that is being logged into the Thingspeak Server. Using an ESP32, an Arduino, a few different soil sensors, and an NRF24L01 Wireless Transceiver Module are the components that you will
need to put together a basic Internet of Things–based soil nutrient monitoring and analysis system.
You built IoT Based Soil Nutrient Monitoring with Arduino & ESP32.
You followed the full workflow from understanding the mission to testing the finished project. That is a real engineering achievement - well done.
Ultrasonic Range Finder with ESP32 TFT Display & HC-SR04
Ready to reuse what you learned in another project from the same track?
Start this project →