How does a Servo Motor Work and How to Interface it with ESP32?
482.How does a Servo Motor Work and How to Interface it with ESP32? One variety of motor known as a servo motor is one that can precisely control the motion of an appliance or machine. A…
Know the mission before touching a wire.
Understand what you are making, prepare the right tools, and make the workbench safe.
Project details
How does a Servo Motor Work and How to Interface it with ESP32? is a iot project. 482.How does a Servo Motor Work and How to Interface it with ESP32? One variety of motor known as a servo motor is one that can precisely control the motion of an appliance or machine. A…
- Source pages
- 1329-1336
- Named parts
- 5
- Build goal
- Working, tested prototype
Tools you need
- Digital multimeter
- Wire stripper and side cutters
- Soldering iron with a fine tip
- Current-limited bench supply
- Computer with a data-capable USB cable
Use eye protection, good lighting, and a clean insulated surface throughout the build.
Safety precautions
- Disconnect every power source before changing a connection.
- Check component polarity, pinout, and supply voltage twice.
- Use a current limit for the first power-up.
- This project may involve hazardous voltage. Work only with qualified supervision and proper isolation.
Gather, identify, and understand every part.
Use the standardized inventory, then open What's this? to learn each part's role, advantages, limitations, handling, and specifications.
What's this?Image, role, pros, cons, handling & specifications
ESP32
A programmable controller that reads inputs, makes decisions, and drives the project's outputs.
What it does hereIt is the control centre and must use the documented board, pin map, supply, and logic level.
Buy / compare this part ↗Advantages
- Reprogrammable and reusable
- Large learning ecosystem
- Complex behaviour remains changeable
Limitations
- GPIO voltage and current are limited
- Some pins affect boot or communication
- Loads normally need a driver
Handling
- Disconnect power before rewiring
- Avoid static discharge
- Never power motors, relays, or pumps directly from GPIO
Specifications to verify
- Use the exact model, value, package, and rating listed for ESP32; similar-looking parts are not always interchangeable.
- Confirm operating voltage, logic level, pinout, memory, USB interface, and maximum GPIO current.
What's this?Image, role, pros, cons, handling & specifications
Servo motor
An output component turns an electrical control signal into light, sound, motion, switching, or displayed information.
What it does hereIt presents the circuit result or acts on the physical world.
Buy / compare this part ↗Advantages
- Makes system state visible
- Can be tested separately
- Supports clear troubleshooting
Limitations
- Loads may exceed controller current
- Polarity or driver direction can matter
- Inductive loads create voltage spikes
Handling
- Use the documented driver stage
- Check polarity and load current
- Add flyback protection for inductive loads
Specifications to verify
- Use the exact model, value, package, and rating listed for Servo motor; similar-looking parts are not always interchangeable.
- Confirm voltage, current, polarity, interface, driver requirements, and duty cycle.
What's this?Image, role, pros, cons, handling & specifications
DC motor
An output component turns an electrical control signal into light, sound, motion, switching, or displayed information.
What it does hereIt presents the circuit result or acts on the physical world.
Buy / compare this part ↗Advantages
- Makes system state visible
- Can be tested separately
- Supports clear troubleshooting
Limitations
- Loads may exceed controller current
- Polarity or driver direction can matter
- Inductive loads create voltage spikes
Handling
- Use the documented driver stage
- Check polarity and load current
- Add flyback protection for inductive loads
Specifications to verify
- Use the exact model, value, package, and rating listed for DC motor; similar-looking parts are not always interchangeable.
- Confirm voltage, current, polarity, interface, driver requirements, and duty cycle.
What's this?Image, role, pros, cons, handling & specifications
Power supply
A power component supplies, converts, stores, or regulates energy for the project.
What it does hereIt must provide the documented voltage, polarity, isolation, and sufficient current safely.
Buy / compare this part ↗Advantages
- Stable power improves reliability
- Current limiting protects first tests
- Regulation reduces resets and noise
Limitations
- Wrong polarity can cause immediate damage
- Underrated parts overheat
- Mains circuits require qualified supervision
Handling
- Measure output before connection
- Use a fuse or current limit
- Insulate exposed conductors
Specifications to verify
- Use the exact model, value, package, and rating listed for Power supply; similar-looking parts are not always interchangeable.
- Confirm input/output voltage, current, polarity, connector, isolation, and thermal rating.
What's this?Image, role, pros, cons, handling & specifications
Potentiometer
A named project component whose exact role is defined by the source circuit and build guide.
What it does hereIt performs a documented electrical, control, interface, or construction function in this project.
Buy / compare this part ↗Advantages
- Selected for this project
- Can be checked independently
- Supports modular troubleshooting
Limitations
- Substitutes may differ
- Generic names can hide variants
- Pinouts and ratings vary
Handling
- Compare the received part with the source
- Keep it labelled
- Do not force connectors or adjusters
Specifications to verify
- Use the exact model, value, package, and rating listed for Potentiometer; similar-looking parts are not always interchangeable.
- Confirm dimensions, ratings, connection method, polarity, and environmental limits.
Connect one verified path at a time.
Explore the named components and standardized signal flow, then use Source Check to verify exact physical pins, values, and topology before applying power.
Trace this circuit.
How does a Servo Motor Work and How to Interface it with ESP32?: interactive parts, standardized terminals, responsive anchored wires, student explanations, and the original circuit reference in one shared system.
Trace before wiring
Follow power, ground, inputs, processing, and outputs in that order. Never guess a pin from package shape alone.
Connect with power off
Make short, labelled connections and share a common ground only where the schematic requires it.
Inspect every joint
Check continuity, polarity, adjacent shorts, and loose connections before the first power-up.
Open all source diagrams and build views 5 visuals
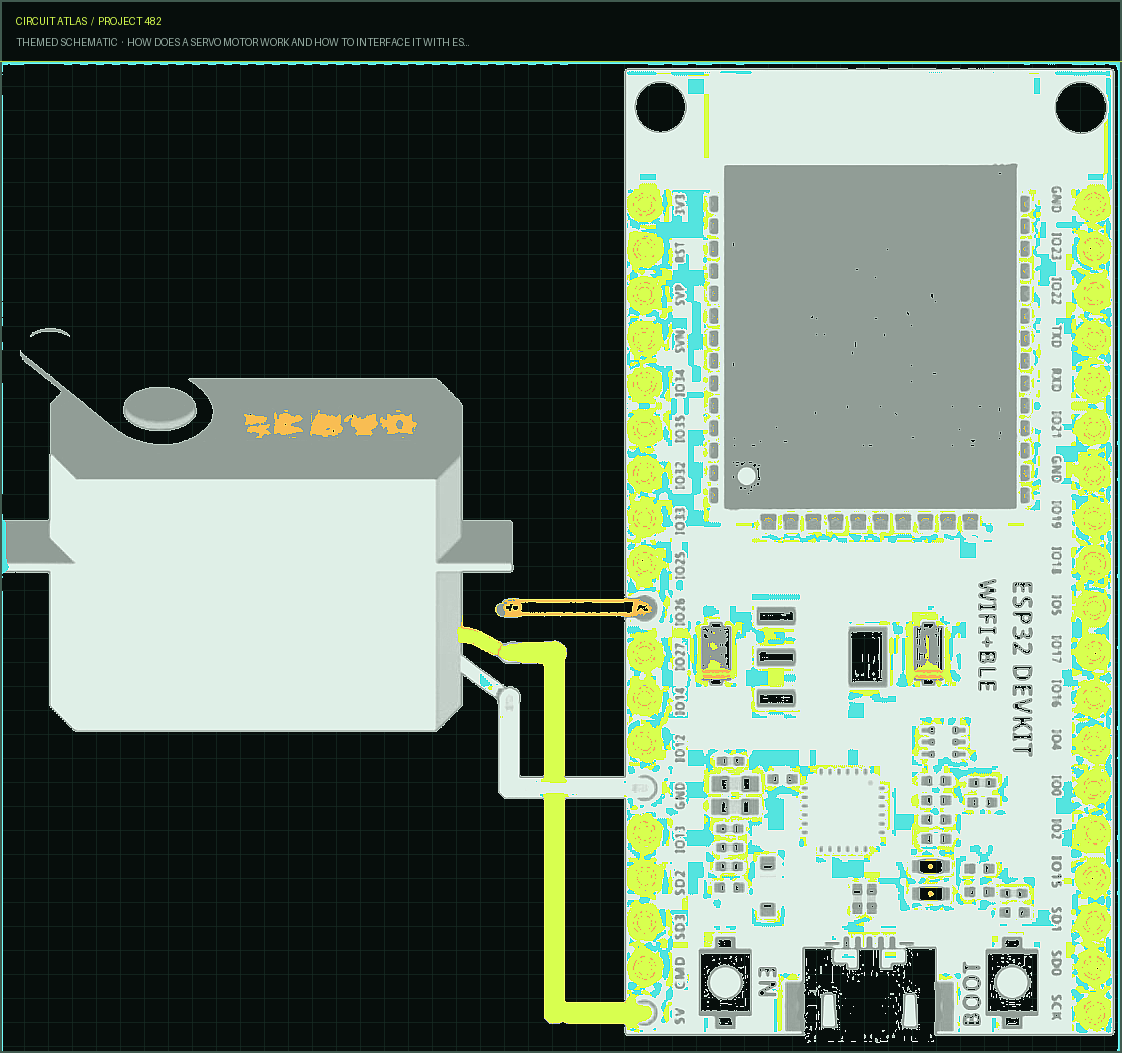
Confirm the hardware-only control path.
This project does not include firmware in the source. The circuit itself provides the required behaviour.
How to connect
- Match every controller label to the circuit view and source pin map.
- Join grounds before signal wires when separate low-voltage supplies are used.
- Keep motors, relays, pumps, and other loads on a suitable driver and external supply.
Common mistakes
Reversed VCC/GND, board-label versus GPIO-number confusion, missing common ground, and charge-only USB cables.
Troubleshoot
Disconnect loads, continuity-test one path at a time, then test with a current limit.
Software preparation
No IDE, board package, library, or firmware upload is required for this project.
If you add a programmable controller as an extension, document its pin map separately.
How to upload code
The original design is implemented entirely in hardware, so proceed after verifying the circuit and supply.
Assemble, deploy, test, and troubleshoot.
Use the complete source notes in build order, then pass the final checks before calling the project finished.
Build in functional stages
- Power and regulation
- Controller or processing stage
- Inputs and sensors
- Outputs and loads
- Enclosure and strain relief
Power up safely
- Inspect unpowered continuity first
- Apply the lowest safe current limit
- Measure supply rails before signals
- Add one load at a time
- Record expected and actual results
Work from simple to complex
- Confirm power, ground, polarity, and orientation
- Compare each pin with the source
- Test inputs separately from outputs
- Replace only one variable at a time
- Power off before every correction
Follow the documented instructions.
These notes come from this project's source and remain in their original order.
Project overview
Project build note482.How does a Servo Motor Work and How to Interface it with ESP32?
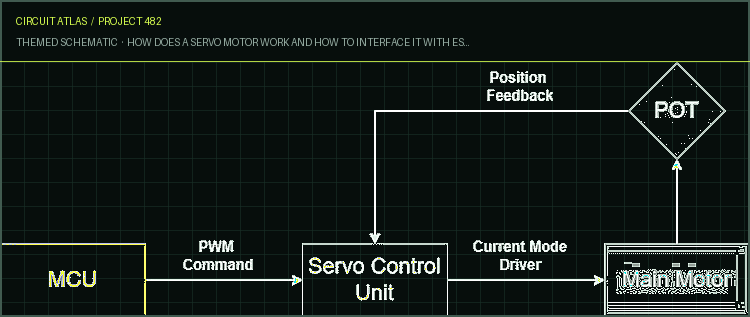
One variety of motor known as a servo motor is one that can precisely control the motion of an appliance or machine. A DC motor, a control circuit, and a feedback mechanism are the typical components that make up this mechanism. The control circuit receives information about the position of the motor shaft from the feedback mechanism. Based on this information, the control circuit modifies the amount of power that is supplied to the motor. Because of this feedback loop, the motor shaft will always move to the precise location that has been determined by the control signal. Servo motors find use in a wide variety of applications, including robotics, CNC machines, and 3D printers, where precise control of positioning is required. Examples of these applications include: Control surfaces in aircraft, such as elevators and ailerons, are another application for these servos. Consequently, we are going to interface an SG90 servo motor with an ESP32 in the course of this lesson, and while we are doing so, we will explain how the internal circuitry of a servo motor functions. At the very
end, we will construct a hardware circuit and write a little bit of code in order to provide you with a deeper comprehension of the servo motor and how it operates. How to Control the Angle of the Servo Motor? In a closed-loop control system, it is the responsibility of a servo motor to control the angle of rotation. Using the feedback from the system, the servo motor then adjusts its speed and angle to achieve the result that is actively desired. A closed-loop control system is utilized by the SG90 servo motor that we are utilizing, which allows us to control the position of the motor's shaft. It is sufficient to supply a 50-hertz pulse width modulation (PWM) signal with a variable duty cycle in order to alter the position of the motor arm. You need to send a series of pulses to the servo motor in order to control the shaft angle of the servo motor; a conventional servo motor anticipates receiving a pulse every 20 milliseconds with a duty cycle of 50Hz. The control board that is housed inside of the servo motor is designed in such a way that the length of the pulse can be used to determine the angle of the servo shaft. If the pulse remains high for 1 millisecond, the servo angle will remain at 0 degrees throughout the duration of the event. The low pulse of 1.5 milliseconds will move the shat to an angle of 90 degrees, and a high
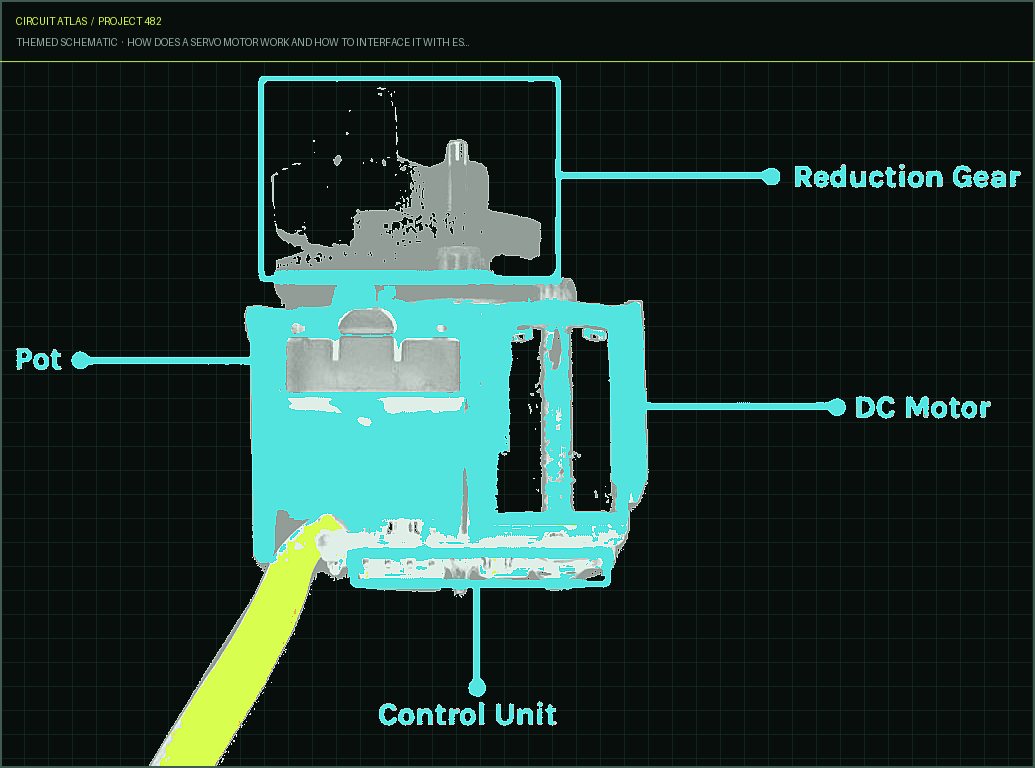
pulse of 2 milliseconds will move the servo arm to an angle of 180 degrees. A pulse lasting between 1 and 2 milliseconds will rotate the servo shaft through 180 degrees when applied to it. SG90 Servo Motor Parts The S90G servo motor is a very cost-effective and low-power device that has many potential applications and can be used in a variety of contexts. The S90G servo motor's internal components are depicted in the following image. As you can see in the image that is displayed above, we disassembled a servo motor in order to show you all of the components that are contained within it. Additionally, the reduction gear, the main motor, the control board, and the potentiometer are all visible on the inside of the motor. The potentiometer is responsible for providing position feedback to the servo control unit, which then evaluates how closely the motor's current position matches the desired position. SG90 Servo Motor Pinout
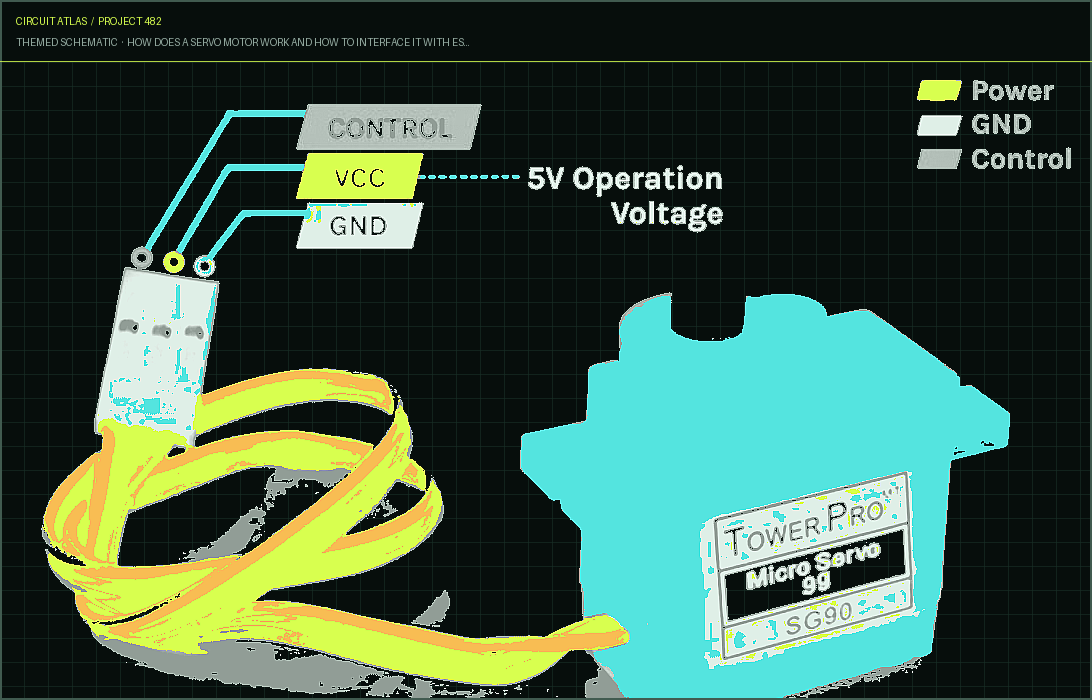
The vast majority of the servo motors you can buy off the shelf will come with three different connections. The following is a description of the
pinout for the SG90 servo
Project build noteGND - refers to a common ground that is shared by the microcontroller and the motor. VCC - is the voltage that the servo gets power from. Control - is the information that comes from a microcontroller or any other control system. Questions That Are Frequently Asked About Servo Motors (FAQ) 1.What exactly is a servo motor? The term "servo motor" refers to a particular type of linear or rotary actuator and can be used interchangeably. Simply put, the term "servo motor" is derived from the term "servomechanism," which denotes that the motion of the motor is constantly monitored and controlled. This is where the name "servo motor" comes from. 2.What is the purpose of a servo motor?
Servo motors, also known simply as "servos," are electrical devices or linear actuators that can rotate elements of a machine precisely and can also be used to push elements of the machine. The most common applications for servos are for linear or angular position control. 3.A servo motor uses AC or DC power.? AC servos and DC servos are the two varieties of servo motors that are available. The primary distinction between these two motors is the type of power supply they use. AC servo motors, in contrast to DC servo motors, get their power from an electrical outlet rather than from batteries. 4.What are the various types of servo motors? Servo motors are available in a wide range of sizes and three distinct configurations. Positional rotation, continuous rotation, and linear motion are the three distinct varieties. Servos that operate in the Positional Rotation mode rotate through 180 degrees. Additionally, they have stops integrated into the gear mechanism, which prevent the output shaft from rotating too quickly. 5.What makes a DC motor different from a Servo motor? Power, ground, and control are the three wires that make up the Servo motor's three-wired system. It is equipped with a control circuit, a position sensor, a gearing set, and four DC motors that are assembled together. A DC motor is a self-contained machine that does not require any assembly. They find application in the control of rudders, robotic arms, and legs. We are now aware of the operation of the servo motor. The servo motor will be controlled by a bit of code that we will write, after which we will be able to connect the ESP32 with all of the necessary wires. The servo motor and the ESP32 are very easy to connect together. You only need to connect the
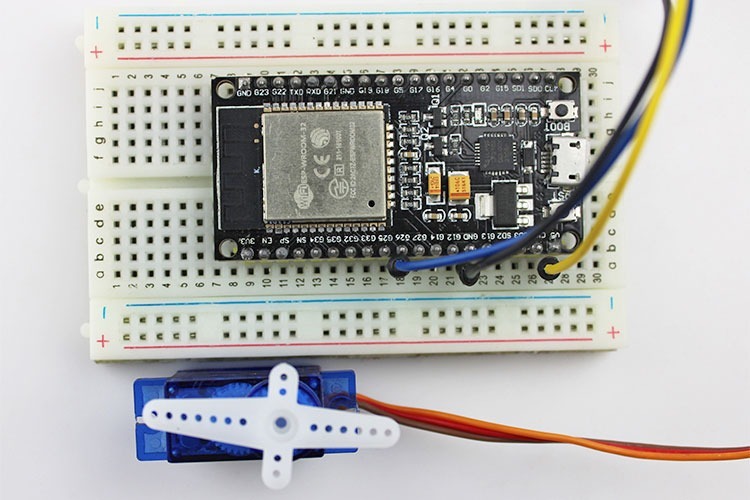
power pin and the servo motor to the ESP32. On the other hand, we need to connect the control pin to any GPIO pin on the ESP332. Following is an illustration of the comprehensive connection diagram for the ESP32 servo motor control project. Servo motor interface code for the Arduino ESP32 The code that must be written in order for an ESP32 to control a servo is very straightforward and easy to grasp. Simply defining a hardware pin in the code is all that is required; ESP32 will take care of everything else for us. First things first, however, we have to get the esp32 servo motor library downloaded. The process of writing code can begin once the library has been successfully downloaded and installed into the Arduino Library. The Servo.h Library is brought into our code at the very beginning by including it, and the Servo instance is also declared at this time. The next thing that we do is declare a variable that we will call pos. The pos variable will store the data that we have calculated regarding the position of our servo. Circuit Diagram Interfacing Servo Motor with ESP32
Servo Motor Connection Errors? - Here's What You Should Do When you run your servo directly from the power supply of the ESP32, there is a possibility that the servo will behave erratically at times. Because when the motor is first started, it draws high current spikes, which can cause the microcontroller to either reset or become permanently damaged. Between the GND supply and the 5V supply, you could install a sizable electrolytic capacitor (between 470 and 1000 uF) to solve this problem. The capacitor serves as a reservoir, and when the motor begins to draw enormous amounts of current, the capacitor can provide the current that is needed to keep the ESP from acting erratically. The capacitor has two legs: the longer one is connected to 5V, and the other one is connected to ground. The shorter of the two legs is connected to ground.
You built How does a Servo Motor Work and How to Interface it with ESP32?.
You followed the full workflow from understanding the mission to testing the finished project. That is a real engineering achievement - well done.

Designing a Smartwatch using ESP32 - Magnetometer and Gyroscope
Ready to reuse what you learned in another project from the same track?
Start this project →